
It's 0/10 10 undead will spawn as he moves to inspect different areas on that last scaffolding. they spawned 2 at a time and went straight for him. He will move after being in a spot for a minute or two, so the spawns will keep coming if you can't DPS fast enough.
Kayrsoc
100 gnomish enchanter
Final Assault
Pocar
Cooper #2: Excavating an Answer
| Quest Started By: | Description: |
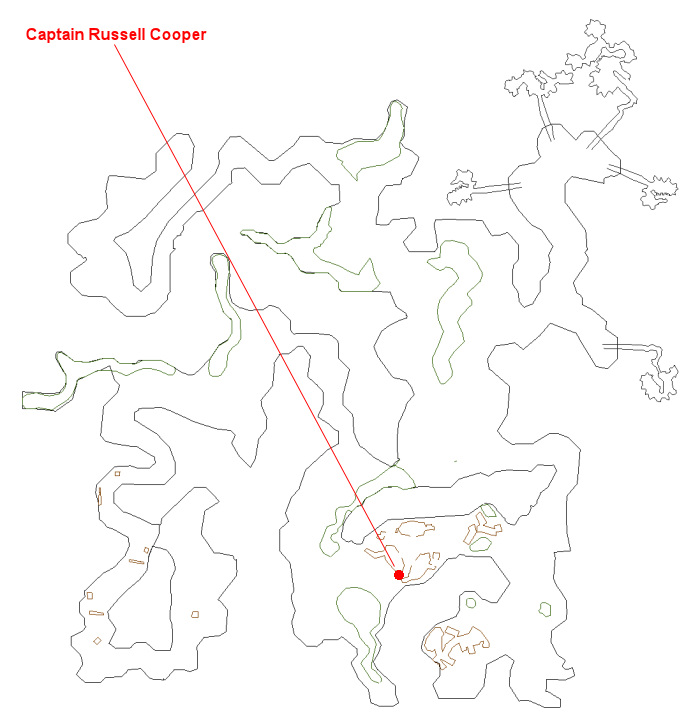
Call of the Forsaken Info & Guides: Overview | Progression & Task List | Raiding | Visible Armor About Heroic Adventures - Heroic adventures in Call of the Forsaken scale in level: As low as Level 75 and up to current maximum level. - Scale is based on the highest level player present in the zone and affects difficulty, loot quality, and mob levels. - There is some variation/randomization in the task steps you'll be assigned as you progress through the task. - Time of completion will vary by your group's makeup (anywhere from 30-90+ minutes). - Collection items appear as ground spawns midway through tasks (you'll see an emote indicating their appearance). - Named mobs (or their PHs) spawn midway through tasks (usually, but always, at the same time collection items appear). - These tasks have individual 3-hour lockout timers (timer gained upon completion). Experience in Heroic Adventures - Mobs in these instances grant some experience, but the bulk of experience is earned upon task completion. - As of a patch in November 2014, less difficult tasks were tuned to reward less experience and more difficult ones were tuned to reward more. - For an added experience bonus, check out Guard Hamarn's "Daily Tasks". This is a heroic adventure (1-6 players) that begins with Captain Russell Cooper (click for map) in the Dead Hills. He is located at about -845, -345, 65 (in the clearing north of the zone-in/dock area). Pre-Requisites for Requesting: - Level 75 - Completed "Clearing a Path" (heroic adventure) TASK SUMMARY - Say "help" to request the task. - Head northwest to Scout Gatius Lienweathar and click the ladder to zone into the instance. Step #1: - Recover an artifact from each of the first two main excavation sites 0/2 --- These can be found in excavation chests (trapped, locked). - Pillage a symbol of station from two excavation captains 0/2 --- Kill the two captains and loot these from their corpses. - Recover several excavation mining picks 0/5 --- Kill "an excavating _____" undead mobs until you've looted five picks. Step #2: - Break through the barrier that blocks your progress 0/1 --- Target the barrier, right-click the items you just looted, then DPS the wall to its destruction. (Adds spawn upon its 'death'.) - Break through the barrier that blocks your progress 0/1 --- DPS the wall to its destruction (health-based adds here). Note : if you get the 2 Captain’s Symbols of Station, hand one each into Guard Captain Tyler Whitson and Guard Captain Milo Hutchins. On turn in, both reply with: '_____ looks over the symbol of station handed to him and nods, ‘This appears to be in order, sir.’ He turns to the wall and waves his hand and vanishes into nothingness. Then after turning in the second Captain’s Symbol of Station the screen rumbles and the wall vanishes with the same 2x "an awakened reaver" attacking you. Step #3: - Recover samples of Deadstone from the elite guards 0/4 --- Kill "an elite _____" undead mobs until you've looted four samples. - Recover samples of Deadstone from the undead commanders 0/4 --- Kill the four named commanders (health-based adds), and loot the samples from their corpses. - Recover samples of Deadstone from excavation supply chests 0/4 --- Loot items from "deadstone supply chest" (locked; trapped; disarmable; DPSable - will spawn adds if you DPS them, however). - At this point in the task, collectibles spawn in the zone (ground spawns) and a named (or its PH) has a chance to spawn. Step #4: - Destroy the supports holding up the excavation towers 0/12 --- Kill 12x "scaffolding support". - Dispose of any hostile guardians that get in your way 0/14 --- Kill mobs on the opposite side of the barrier you broke through. - Defend the Archaeologist as he inspects the remaining excavation sites 0/10 --- Kill the undead mobs that spawn (two at a time) and attack the Archaeologist. Step #5: - Deliver the samples of Deadstone to Scout Daniel Willman 0/4 --- Hand in the Deadstone samples to the Scout at the end of the path. - As soon as the objective for Step #5 is done, the task completes. NAMED MOBS Three named mobs ("Jattius Rattican", "Marcelyn Sjobern", and "Spirit of the Hills"; or their respective PHs) have chances to spawn after you complete the third step in the task. They drop the same stat items (can also drop Tier 1 armor templates and Rank II spells): Armor of Dark Rage Berserker King's Pauldrons Blood Drinker's Coating Their PHs are a vilefang scavenger, a lingering templar, and a tireless crusader, respectively. 
TASK IN DETAIL ======================================================================== TRIGGERING THE TASK ======================================================================== You say, 'Hail, Captain Russell Cooper' Captain Russell Cooper nods, 'So ya survived yer first excursion, not bad. We're poised to move a scouting party forward once the second leg of the road is clear. Ya did such a fine job the first time, I'd be a fool not to ask for yer [help] again.' You say, 'I'll help you' Captain Russell Cooper says 'Just head that way 'til ya meet up with Scout Lienweathar. He'll be standing by the makeshift ladder.' You have been assigned the task 'Excavating an Answer'. Thanks to your efforts we have been able to send a few scouts in your wake to secure the roads you have cleared. With the information Scout Leader Zatkin provided us, we have a better idea of what lies between us and the Qeynosian expedition party. Work with Scout Leader Zatkin to clear a path towards the ruins and see what you can find along the way. LOADING, PLEASE WAIT... You have entered The Dead Hills. Scout Leader Ryan Zatkin says 'Back again, _____? Well, glad to see you. The road to the tower isn't getting any easier as we progress forward. If you could keep an eye out for anything of interest as we tread through the ruins, I'm sure our scholars would appreciate it. Speaking of which, I think Don is interested in following along and studying the remains of anything you don't break. If you need to return to camp for provisions, just use this teleport stone.' Archaeologist Don Laborm says 'Don't mind me. I'll just be following along to study the remains of the expedition party. I shall do my best to stay out of your way.' ======================================================================== STEP #1 ======================================================================== Recover an artifact from each of the first two main excavation sites 0/2 (Dead Hills) Task Window Says: ? If You Get This Step: You may want someone that can disarm and pick lock to open "an excavation crate". Kill the trash mobs to get to the chests, and then open them and loot. (You may be able to just DPS these, but get adds in the process.) ===================== Pillage a symbol of station from two excavation captains 0/2 (Dead Hills) Task Window Says: ? If You Get This Step: Loot "Captain's Symbol of Station" from Captain Kurt Morrison and Captain Seth Liebeskind. Note: Each Captain spawns health-based skeleton adds (one at a time; adds are rootable): 90%, 70%, 50%, 30%, and 10%. ===================== Recover several excavation mining picks 0/5 (Dead Hills) Task Window Says: It seems the excavation party set up a number of barricades to prevent outsiders from interfering with their work in building the tower. A strange wall blocks our progress. We believe it will be easier to break through the wall using ancient excavation tools. If You Get This Step: Kill "an excavating _____" mobs until you've looted five picks. ======================================================================== STEP #2 ======================================================================== Break through the barrier that blocks your progress 0/1 (Dead Hills) Task Window Says: Find a way to break through the wall that impedes our path. If You Get This Step: There are three variants of this step. If in the first step you obtained "Glowing Qeynosian Artifact" or "Excavator's Mining Pick", then you need to walk up to the targetable wall and, while close, right-click all items you just looted. This should destroy the wall (or bring it close enough to zero so that you can finish it off). if you get the 2 Captain’s Symbols of Station is to hand one each into Guard Captain Tyler Whitson and Guard Captain Milo Hutchins. On turn in, both reply with: XXXXX looks over the symbol of station handed to him and nods, ‘This appears to be in order, sir.’ He turns to the wall and waves his hand and vanishes into nothingness. Upon the wall's destruction, 2x "an awakened reaver" spawn and auto-aggro everyone in the zone (each hits for a max ~17,000 and AE rampages). These mobs can be rooted, snared, and temporarily memblurred (they will remain blurred for up to about a minute but not that long some of the time). ===================== Break through the barrier that blocks your progress 0/1 (Dead Hills) Task Window Says: Find a way to break through the wall that impedes our path. If You Get This Step: There are two variants of this step. If in the first step you obtained "Captain's Symbol of Station", then you need to walk up to the targetable wall and DPS it. In this case, the wall spawns health-based adds. You can expect them to be auto-aggro and each hit for a max ~17,000. ======================================================================== STEP #3 ======================================================================== Recover samples of Deadstone from the elite guards 0/4 (Dead Hills) Task Window Says: ? If You Get This Step: Kill "an elite _____" undead mobs until you've looted four samples. ===================== Recover samples of Deadstone from the undead commanders 0/4 (Dead Hills) Task Window Says: The mineral structure of the hills seems to darken as we get closer to the tower. It would be helpful if you could collect several samples of this stone for later study. You should be able to find pristine samples from the elite soldiers that roam the area. If You Get This Step: Kill the four named commanders and loot the samples from their corpses. Note that the commanders are harder mobs compared to other mobs in the zone, and that they each spawn health-based adds (reported at approximately 70%, 50%, 25%, and 5%). ===================== Recover samples of Deadstone from excavation supply chests 0/4 (Dead Hills) Task Window Says: The mineral structure of the hills seems to darken as we get closer to the tower. It would be helpful if you could collect several samples of this stone for later study. You should be able to find pristine samples from the supply chests scattered around the excavation sites. Beware of any traps that the Qeynosians may have set up to deter thieves. If You Get This Step: Loot 4x "Unrefined Dreadstone shard" from "excavation supply crate". These chests are trapped and locked, so you can use disarm and unlock abilties to handle them. If you can't, you can just break them open, but this will spawn adds as you do DPS to them. Note that if you did not kill the two reavers spawned from destroying the wall in the previous step, they will re-aggro (regardless of where you are in the zone) once you complete this step. ======================================================================== STEP #4 ======================================================================== Destroy the supports holding up the excavation towers 0/12 (Dead Hills) Task Window Says: One of our scouts has a theory that the undead are returning to life in servitude toward the creation of the tower. While it may sound strange, we have a plan to put this theory to the test. Destroy the supports holding up the excavation scaffolding. If the spirits don't resume their attack, that means we can put them to rest by eliminating their ability to construct. If You Get This Step: Kill 12x "scaffolding support". They look like stone brick columns on the wooden scaffolding and should be fairly noticeable. Nothing adds to these, so you can just send in pet or cast from afar. ===================== Dispose of any hostile guardians that get in your way 0/14 (Dead Hills) Task Window Says: The Qeynosian spirits exhibit strange behavior, even for the undead. We would like you to help determine what it is that keeps them bound to the land. Eliminate a number of them as you progress toward the tower. We will study the trail of the dead-undead that you leave in your wake. If You Get This Step: This is a kill update of mobs on the other side of the barrier your broke through. Note that the mobs involved with this step are red-cons, see invisibility, are immune to mez/stun, can have high damage spikes in their DPS, and have a lot of hitpoints compared to other mobs (estimated around 2 million hitpoints each). ===================== Defend the Archaeologist as he inspects the remaining excavation sites 0/10 (Dead Hills) Task Window Says: ? If You Get This Step: Archaeologist Don Laborm will move around to inspect different areas of the last scaffolding. As he does, undead mobs spawn in waves of two and attack him. He will move after being in a location for 1-2 minutes, so the spawns keep coming until you've killed 10. ======================================================================== STEP #5 ======================================================================== Deliver the samples of Deadstone to Scout Daniel Willman 0/4 (Dead Hills) Task Window Says: One of our sneakier scouts will be waiting for you at the end of this path. He is surprisingly adept at sneaking past hoards of undead, so he has proven useful in our endeavors to study the tower. Deliver the samples of Deadstone that you have collected to him and we will discuss our plans for a journey into the ruined tower. If You Get This Step: Hand in the items to complete the task. Archaeologist Don Laborm bows his head in thanks, 'Thank you most kindly for your help. You can go ahead now. I won't be bothering you anymore.' Scout Daniel Willman says 'You made it. Slower than I would have expected given the amount of fanfare surrounding your name, but no matter. Don tells me that your party has collected some samples of the stone that the expedition party was mining before they fell into ruin. If you could deliver those stones to me, I will ensure that they reach our scholars for study.' Upon turn-in: Scout Daniel Willman looks over the stones and nods, 'These will do nicely, I'm sure our scholars will learn much from their study. Thank you, _____. You can use this teleport stone to return to camp. I'm sure our officers will have more work for you soon.' Songs of your triumphs will grace the campfires of all scouts in the hills for days to come. You have secured a road into the heart of the ruins and our scouting party shall reconvene with you shortly to make a final push toward the tower. TASK REWARDS - a varying amount of platinum - a varying amount of experience - a varying number of Marks of Valor (currency used to buy group gear) | |
| Rewards: | |
| Send a Correction | |
Quote:
Their PHs are (unknown which mob is which named's PH) "a lingering templar", "a vilefang scavenger", and "a tireless crusader"
a tireless crusader = the PH for Spirit of the Hills
a vilefang scavenger = should be the PH for Jattius Rattican
a lingering templar = should be the PH for Marcelyn Sjobern
Steps encountered at level 100 solo:
What to do for each step:
Overall, not a terrible mission aside from the trapped / locked boxes. I had never successfully removed traps or locks before so that was fun to do finally hehe... Remember to bring Greater Scrying Stones for the sensory / disarm trap portion of this task.
At some point near the end, Spirit of the Hills and Jattius Rattican spawned near the end of the chasm. I attempted both kills, but unfortunately got neither. :/
Jattius Rattican:
-Casts "Infectious Agony" or some similarly-named spell which added enough DPS to kill my pet pretty quickly (twice!)
Spirit of the Hills:
-Single-target rampage killed me before I got him below 99% D:
Edited, Oct 16th 2013 2:34am by Krosar
- Recover several excavation mining picks ....... 0/5
- Break through the barrier that blocks your progress ....... 0/1
- Recover samples of Dreadstone from excavation supply chests ....... 0/4
- Destroy the supports holding up the excavation towers ....... 0/12
- Deliver the samples of Dreadstone to Scout Daniel Willman ....... 0/4
What to do for each step:
- Loot 5x "Excavation Mining Pick" from "an excavating XXX" (where XXX == templar, defiler, evoker, etc.)
- Walk up to the target-able wall and target it. While close, right-click all 5 mining picks you just looted. This should destroy the wall (or bring it close enough to zero so that you can finish it off). I got adds initially attacking it, but when I realized that I needed to use the pick and FD'd the adds did not come back. This may be due to FD mechanics or due to the mining picks not causing adds, I am unsure.
- Loot 4x "Unrefined Dreadstone shard" from "excavation supply crate". These chests are trapped and locked. As a necro, I could cast Reebo's/Wuggan's augury follow by Reebo's/Wuggan's Greater Exorcism to remove the trap, then use Archaeologist's Automated Antiquity Analyzer to pick the lock. This allows you to /open the box without getting any adds. (Note: I was unable to disarm the traps using the AAAA, but I could use it to pick the lock. This may have been bugged since I initially attacked the box, not realizing it was trapped.) The other option (if you can't sense/disarm traps and/or lockpick) is to break the box open, but doing so causes adds to spawn. I recommend that if you take this route you kill the adds as they spawn, instead of burning the box, as the adds can pile up quickly and overwhelm you.
- Kill 12x "Scaffolding support". They look like stone brick columns on the wooden scaffolding and should be fairly noticeable. Nothing adds to these, so you can just send in pet or cast from afar.
- Find Scout Daniel Willman at the end of the chasm and hand him the 4x Unrefined Dreadstone shards that you looted from the crates.
Overall, not a terrible mission aside from the trapped / locked boxes. I had never successfully removed traps or locks before so that was fun to do finally hehe... Remember to bring Greater Scrying Stones for the sensory / disarm trap portion of this task.
At some point near the end, Spirit of the Hills and Jattius Rattican spawned near the end of the chasm. I attempted both kills, but unfortunately got neither. :/
Jattius Rattican:
-Casts "Infectious Agony" or some similarly-named spell which added enough DPS to kill my pet pretty quickly (twice!)
Spirit of the Hills:
-Single-target rampage killed me before I got him below 99% D:
Edited, Oct 16th 2013 2:34am by Krosar
The Rathe / Prexus
Krosar Shadowflame - 105 Necro
Rasork - 105 Druid
Imacatlol - 105 Bard
Yaldax Toknight - 105 Rogue
Savi Yorr - 105 Paladin
Krosar Shadowflame - 105 Necro
Rasork - 105 Druid
Imacatlol - 105 Bard
Yaldax Toknight - 105 Rogue
Savi Yorr - 105 Paladin
Scholar
44 posts
To step #1 - the exacation of several mining picks - you have to get 5 of them (0/5)
Scholar
24 posts
14 posts
188 VLAOR MARKS, 3HRS OF UNDEAD KILLING XP GALLOR
Paladin Dwarf
[ETWK = Ethemere Tainted West Karana]
Read somewhere that these are supposed to take 30-40 minutes. Also heard that these are for 3 toons + 3 mercs and that they scale. I haven't actually parsed our DPS but from how fast we knock down mobs with posted HPs we're roughly 50K DPS. This is, at best, a rough estimate but I tried to do a bit of math and came up with roughly 150-160 Meg Hps for the mobs we killed (counting summoned adds, etc.). To do this in the stated 30 minutes, you'd have to average about 110K DPS, non-stop for over an hour with no down time.
We (or at least I) have been deceived.
So far we've mostly stumbled through these doing poorly early but usually improving as we got a feel for the things they like to do.
We also decided that for our group, 6 real toons run by to real people (our PL'ee sk being dragged around doing nothing) that whatever level they picked was really hard. For the #1 mission in Bixie and here (Dead Hills) we took 3 hrs almost exactly. That included perhaps 20 minutes of RL interruptions. For this mission, we both had almost two hours of real life and ended up running about 3.5 hours.
For the 5 level 100s, the reward was 216 Marks each (we had 520 total after this and believe we got 152 from the first two #1's we did).
But here's the kicker: The worst mobs are red cons, I assume 103's you have to kill 4 Commanders that spawn 4 adds that are roughly equal to ETWK zone trash. The Commanders are roughly equal to a tank-n-spank Named in ETWK, some of them did some low-level group damage but nothing that was a real problem.
We run 3 mages and a cleric primary. Wizzie just dinged 100 and bro was trying to kick in some DPS on him but we're ignorant of how to play a wizzie right so he was but a fraction of his capability. Cleric is solid. Entire 100 primary players have at least 2K, most 4-5K AA's. All are Rof.tier4 geared.
The quest tasks are:
1-Recover an artifact from each of the first two main excavation sites 0/2
2-Break through the barrier that blocks your progress 0/1
3-Recover samples of Deadstone from the undead commanders 0/4
4-Dispose of any hostile guardians that get in your way 0/20
5-Deliver the samples of Deadstone to Scout Daniel Willman 0/4
1 - You'll need a toon that can open a locked chest. Our wizzie did it. It also said disarm which we did not do separately that I caught. Maybe the wizzie's spell did both but we had several toons that could disarm, the unlocking may be an issue for your group. Kill the trash mobs to get to the chests open them and loot (these do not need to be turned in, credit on the loot).
2 - Mouse click targetable barrier, believe it said "fragile" in the description. It spawns mobs, dark blues, guessing level 99s that were some of the easier trash following a screen emote that it's coming. Probably an easy cover for most groups. I'll have to look up Fragile, I'm guessing Webster will have it listed as 10Meg HPs or something. Don't Know what the HPs of this was and but it took us about 10 mins to drop it (although we got to gumming it down gently ready to pounce on the adds).
3 - Recover the samples of Deadstone from the undead commanders. These are the loots off the commander corpses. These commanders are tough. The Named guys in ETWK don't get close to dropping my EM14 pet running shammy, chanter, cleric and mage buffs but I lost 2 pets during these fights (near the end). There may be something special (like reflection or something) going on when they spawn the add because that's when it got really tough (despite the adds being covered by other pets which are easy tanks).
We found the Commanders to be a challenging fight (enjoyed the challenge but we wiped on one and lost 3 pets total on the rest of them).
4 - Dispose of any hostile guardians. These are fairly tough mobs. Had to stay atop my cleric for the pet heals. We found two splits and we didn't really want doubles of these (and never did fight a double). Some of the caster types spawn trivial adds.
5 - Turn in the 4 loots off the commanders.
Good luck all. They aren't kidding on these (for our skills and gear anyway).
Free account required to post
You must log in or create an account to post messages.© 2024 Fanbyte LLC