Last updated: Fri Apr 19 05:00:32 2024
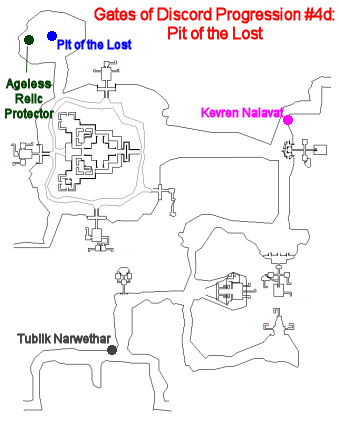
Pit of the Lost
When you spoke with Kevren Nalavat about "other tasks", you saw:
Kevren Nalavat says 'As I suspected, you're ready for some challenging work! I must warn you though, what lies ahead is not for the faint of heart. The other tasks that are available deal with three other areas. Those areas are the [Martyrs Passage], the [Pit of the Lost], and the [Crumbled Sanctuary] of the Divine. Choose the one you wish to attempt and we can continue.'
You say, 'What about the Pit of the Lost?'
Kevren Nalavat says 'I'm glad you've decided to continue helping the brotherhood. We can always use adventurers like you. There have been some mysterious happenings coming from the Pit of the Lost. I don't have the information on what's going on, but another of the brotherhood nearby does. You must venture south of the Martyrs Passage and speak with Tublik Narwethar. He will know what's going on.'
Tublik
Head to the far southwestern part of the zone where you'll find Tublik Narwethar (click for map image) at about /loc -2000, 1275, -348.
You say, 'Hail, Tublik Narwethar'
Tublik Narwethar glances at you suspiciously. 'Can I help you with something? Did Kevren send you about the Pit of the Lost? Speak up!'
You say, 'Kevren sent me'
Tublik Narwethar says 'Ah yes, so he did. I've been dealing with some others that Kevren has sent my way. What can I do for you specifically?'
You say, 'Tell me about the Pit of the Lost'
Tublik Narwethar says 'I see Kevren finally sent someone to me to look into the pit. It's about time! I've been telling him over and over that there are some really strange things going on in the Pit of the Lost to the north of here, but he just doesn't seem to want to pay enough attention to the claims. In any case, you're here now and that means that you must be [willing to look] into the odd occurrences, right?'
You say, 'I am willing to look'
Tublik Narwethar says 'I'm glad I can count on you. You need to know a couple things before you go. As I said, there are strange things going on in the pit, but we're not sure what they are yet. We have sensed an energy force emanating from that area and believe there are some kind of artifacts there that must be collected. We need you to [collect the artifacts] and return them so we can study them.'
You say, 'I'll collect the artifacts'
Tublik hands you a bag and says, 'Place four artifacts you find from the pit in this bag and seal it off. Return the sealed bag to me when you're done so I can further examine what you find. Make haste to the Pit of the Lost and be careful -- there's no telling what kind of evils are waiting for you there. If you have someone else with you that [needs a bag], have them tell me so.'
You receive "Tublik's Bag".
Relic Devotees
Head to the very far northwestern part of the zone where you'll find a large pit (the "Pit of the Lost") swarming with undead. Among the mobs that can spawn in place of standard trash mobs are "Forlorn Relic Devotees" - these mobs are tougher than the general zone population. They hit for a max ~1,700 and are immune to all forms of crowd control.
Kill and loot them until you've collected four items:
Minor Relic of Energy: Nep
Minor Relic of Energy: Oxa
Minor Relic of Energy: Suv
Minor Relic of Energy: Tek
Combine these in "Tublik's Bag" to produce "Tublik's Sealed Bag", and then turn it in to Tublik.
Tublik Narwethar says 'You're done already? I wasn't expecting such a prompt response, but nicely done _____! Give me a while to examine these artifacts. I should have some additional information for you once you return.'
The Ageless Relic Protector
You say, 'Hail, Tublik Narwethar'
Tublik Narwethar says 'Welcome back, _____. I've been looking over those artifacts you returned to me in the sealed bag and I'm afraid I have some disturbing news. It seems the artifacts weren't artifacts at all, but objects of ghastly power held by the dark spirits you collected them from. What's worse is that since you've collected these objects, the energy emanating from the pit has [gotten stronger]!'
You say, 'Gotten stronger?'
Tublik Narwethar says 'The power wasn't as noticeable before. Now, though, it seems there's a fiend in the pit that's become agitated by the removal of these objects we've been collecting. I believe that whatever is behind the energy disruption kept a watchful eye over those objects. Now that they're gone, I believe it will try to find them again and destroy anything and everything in its path in the process. You must [stop it] before it has a chance!'
You say, 'I'll stop it!'
Tublik Narwethar says 'You must return to the Pit of the Lost and find whatever this fiend is and destroy it. I believe that it will have some kind of artifact that is linked to the ones you returned to me in the sealed bag. Return whatever it may have to me. Good luck, _____, I have no doubt that the artifact it holds will be as interesting of a find as anything else we've uncovered so far!'
Head back to the Pit of the Lost where you'll now find the "Ageless Relic Protector" overlooking the western edge of the pit.
The Ageless Relic Protector recognizes those who took its relics and prepares for battle.
Ageless Relic Protector charges those who stole the relics it protects!
The mob hits for a max ~2,200 and AEs "Strike of Glory". Upon its death, it splits into 2x "Ageless Relic Protector" (hit for a max ~1,500 each):
Ageless Relic Protector gets its bearings and continues its assault on the relic thieves!
Each of these two split mobs split into an additional 3x "Ageless Relic Protector" (for a total of six more) which need to be killed to complete the event. The final splits hit a bit harder than the second splits, but not much more difficult. All mobs are immune to all crowd control. No balancing is required.
Ageless Relic Protector has been slain by _____!
Each of the final six split mobs drops a "Protector's Relic of Energy" (turn-in item for this quest).
One of the mobs drops one item of loot:
Ageless Spectral Cuffs
Gaunt Veil of Purification
Haggard Trusik Shawl
Reflective Orb of Energy
Sandals of Spectral Ferocity
Return to Tublik
Hand in the "Protector's Relic of Energy" to Tublic Narwethar:
Tublik Narwethar says 'Excellent! We don't have to worry about that abomination any longer. This artifact you found on the creature is also quite unique. It will be a while before I have a chance to look it over, but it's nice to have it in our possession nonetheless. Well done once again, _____. I look forward to working with you again soon!'
This completed the "Pit of the Lost" portion of Gates of Discord progression.
You say, 'Give me a progress update'
Finished! - You can now retry any of the trials at any time!
Finished! - You have completed the trial at the Temple of Singular Might!
Finished! - You have completed the trial at the Temple of Twin Struggles!
Finished! - You have completed the trial at the Temple of the Tri-Fates!
Finished! - You've been commissioned to investigate the Martyrs Passage!
Finished! - You've returned four relics from the Martyrs Passage!
Finished! - You've returned valuable information as to why the Muramites are in the Martyrs Passage!
Finished! - You've been commissioned to investigate the Temple of the Damned!
Finished! - You've recovered important glyphs from the Temple of the Damned!
Finished! - You've successfully translated the glyphs you found in the Temple of the Damned!
Finished! - You've collected the Minor Relics of Power from the Pit of the Lost!
Finished! - You've rescued the artifact from the Ageless Relic Protector in the Pit of the Lost!
Kod'Taz still has secrets left to uncover...
Moving On
You are now done with the Pit of the Lost.
Next up is the "Crumbled Sanctuary".
Ikkinz Group Trial #1: Singular Might (Normal):
Requesting the Expedition
If this is your first time doing this Ikkinz trial, you will need to first speak with Kevren Nalavat (click for map image) in Kod'Taz, the Broken Trial Grounds, as part of Gates of Discord Progression.
If you follow his dialogue and say "Singular Might", he directs you to see Gazak Klelkek (click for map image), who gives out this expedition.
If you've already done progression, you can bypass Kevren Nalavat and speak directly to Gazak Klelkek.
You say, 'Hail, Gazak Klelkek'
Gazak Klelkek says 'Keep your voice down! We must not attract any [undo attention] to ourselves here. I may be the liaison for the Temple of Singular Might, but that doesn't make me any less of a target. I have kept watch of this temple since we began collecting information on the trusik and the Legion of Mata Muram. You should ask Kevren for more information on them if you haven't already.'
You say, 'What undo attention?'
Gazak Klelkek says 'Certainly you do not believe that we are alone here, do you? The Muramites have assigned one of their magic users to gather spiritual artifacts from this area and use their power to gain strength. This creature, which we have dubbed the [Diabolic Destroyer], controls the temple and its inner abominations.'
You say, 'What is the Diabolic destroyer?'
Gazak Klelkek says 'It is one of a fearsome collective that commands minions to do its bidding. The beast's minions recover the artifacts from within the temple. The master then extracts the energy from the artifact to become more powerful. You and your party must venture inside the temple and [eradicate the beast] before it can recover any more artifacts. The Muramites will reinforce their position shortly after it has been defeated, but we cannot allow any single creature of this sort to become too powerful.'
You say, 'I will eradicate the beast!'
Gazak Klelkek says 'Your task is to battle through the temple and enter an entrance to the inner chambers of the Temple of Singular Might. Once inside you must find the Diabolic Destroyer and kill it before it becomes more powerful. You must recover an artifact from the beast and return it to me. Once you have done this, you will be allowed to move onto the next trial. When you are [ready to proceed] and have a group with you, return to me and I shall set you on your way.'
You say, 'I am ready to proceed'
Gazak Klelkek says 'Very well then, _____. Good luck on your journey through the temple and may you prove to the brotherhood that you are more than meets the eye. The temple awaits...'
The direction to the entry to your instanced zone(s) have been marked on your compass.
Ikkinz, Chambers of Singular Might is now available to you.
The instance entrance is in the temple due east of Gazak Klelkek.
Lockout Timers
As soon as you request the expedition, you receive a 1-hour lockout timer. If you kill a loot-dropping named in the instance, you receive an 8-hour lockout timer. If you kill the Diabolic Destroyer, you receive a 17-hour lockout timer. (All timers are from the point of request.)

Named Mobs
Named mobs that are confirmed to spawn in this instance:
Pixtt Annihilator (loot dropper)
Pixtt Decimator (isn't known to drop any stat loot)
Pixtt Slaughterer (isn't known to drop any stat loot)
Pixtt Venomblade (loot dropper)
Named mobs have a chance to be up as soon as you zone in.
Expedition
General mob population here tend to hit for a max ~1,450 while named (loot dropping) mobs tend to hit for a max ~2,400.
Here, you need to make your way to the first room on your right where you'll find the Diabolic Destroyer. You need a strong tank, cleric and bard/enchanter for this encounter.
NOTE: The Diabolic Destroyer will clear its hate list if the tank uses his/her defensive discipline. Upon engaging the destroyer, three adds ("Dire Illusion"; hit for a max ~1,000; stunnable/mezzable/kiteable) spawn. Every 10 seconds, two more of these adds spawn.
You'll see this emote when the adds appear:
Diabolic Destroyer says 'Foul creatures! I will not be stopped! These should take care of you for a while!'
Upon the Diabolic Destroyer's death, the expedition locks, and you see:
Diabolic Destroyer has been slain by _____!
The Diabolic Destroyer has been defeated! Though the legion may send a replacement, you have finished what you sought out to do and delayed their progress for a time! Congratulations!
At this time, an Ikaav called "Cruel Illusion" spawns and aggro's. This is a rather trivial encounter in comparison. Kill the illusion and, if you're here for progression, loot the "Ruined Pendant of Might" from its corpse (six of them are dropped at a time).
Cruel Illusion has been slain by _____!
Cruel Illusion's corpse can no longer serve its creator.
The pendant is used as part of Gates of Discord Progression.
The Diabolic Destroyer drops a loot item and sometimes a spell rune.
Repeating the Trial
You can repeat the trial at any time by speaking with Gazak Klelkek again:
You say, 'Hail, Gazak Klelkek'
Gazak Klelkek says 'Though you have already completed the first trial we can always use someone to eradicate a ferocious beast. If you are looking for something else to do, return to Kevren Nalavat to see if he has anything else in store for you. If you want to attempt this trial again and [eradicate the beast], just tell me so and I will prepare you for your trial.'
This leads into the same text as above. Reward: Glyphed Prayer Ring
Reward: Resonating Earring of Battle
Reward: Spiritstone of Life
Reward: Bracelet of the Fearsome
Reward: Dark Belt of Wrath
Reward: Incantor Mask of Death
Reward: Earring of Destructive Essence
Reward: Ruined Pendant of Might
Reward: Glyphed Sandstone
Ikkinz Group Trial #2: Twin Struggles (Normal):
Requesting the Expedition
If this is your first time doing this Ikkinz trial, you will need to first speak with Kevren Nalavat (click for map image) in Kod'Taz, the Broken Trial Grounds, as part of Gates of Discord Progression.
If you follow his dialogue and say "Twin Struggles", he directs you to see Maroley Nazuey (click for map image), who gives out this expedition (/loc -1965, -625, -430 -- far southeastern part of the zone).
If you've already done progression, you can bypass Kevren Nalavat and speak directly Maroley Nazuey.
You say, 'Hail, Maroley Nazuey'
Maroley Nazuey says 'At last you have arrived. I have heard that you passed the trial at the Temple of Singular Might without any problems and I congratulate you on your achievement. Do not believe for a moment that you are done! Your next trial will be more difficult than the last. Are you ready to hear [what's in store] for you beyond the temple exterior?'
You say, 'What's in store?'
Maroley glances toward the temple. 'The Muramites have sent priests to this temple. These priests are not ordinary, in fact, they are terrible, horrific beings sent to collect artifacts for a singular purpose. What this purpose is we are not clear on, but we believe it has something to do with a summoning of some sort. If you're willing to [test your mettle] in this trial, now is the time for action.'
You say, 'Test my mettle?'
Maroley Nazuey says 'The rumor we have been investigating suggests that the summoning will be a beast of war that is far more destructive than anything we may have seen so far. The Muramite [priests] working inside this temple are gathering artifacts of corporeal power that will grant the beast an unusual physical strength when it is conjured. We must make sure that they do not finish this summoning.'
You say, 'What about the priests?'
Maroley Nazuey says 'I nearly forgot. You must venture inside to an entrance to the inner chambers of the Temple of Twin Struggles and enter there. Once inside you must find the Malevolent Priests. We have begun referring to them thusly because of their torturous looks and ways. They are very unpleasant and work cooperatively. You must get to them and [recover the artifacts] they have been gathering before they are allowed to move them to another temple nearby.'
You say, 'Recover the artifacts?'
Maroley Nazuey says 'This is your moment, _____. Now is the time to prove your worth to the brotherhood. I bid you good luck and hope that the strength you showed in the first trial will aid you again in your second one. When you are [ready to enter the temple] and have a group with you, return to me and I shall set you on your way.'
You say, 'I am ready to enter the temple'
Maroley Nazuey says 'Good luck then, _____. Perhaps I will see you again soon and, by that time, I hope you have the artifact in your possession.'
The direction to the entry to your instanced zone(s) have been marked on your compass.
Ikkinz, Chambers of Twin Struggles is now available to you.
The instance is entered via the temple just northeast of Maroley Nazuey's location (it's the western instance entrance inside that temple).
Lockout Timers
As soon as you request the expedition, you receive a 1-hour lockout timer. If you kill a loot-dropping named in the instance, you receive an 8-hour lockout timer. If you kill the two Malevolent Priests, you receive a 17-hour lockout timer. (All timers are from the point of request.)

Named Mobs
Named mobs that are confirmed to spawn in this instance:
Hexxt Deathaim
Pixtt Airstrangler
Pixtt Neuromancer
Pixtt Venomblade
Rav Deathfang
Rav Interceptor
Named mobs have a chance to be up as soon as you zone in.
Expedition
General mob population here tend to hit for a max ~1,450 while named (loot dropping) mobs tend to hit for a max ~2,400.
The first thing you'll see upon entering the zone is a locked door guarded by three ukuns. The middle ukun is immune to mez and stun while the others are susceptible to crowd control. Once all three are dead, the door unlocks.
From here, you need to make your way to the first room on the left. The two closed-off chambers house the Malevolent Priests, so don't enter them yet. Clear the room of mobs first, and then when ready for the final encounter, you can let the priests spot you.
Once the Malevolent Priests see you, they begin casting spells on your party:
Malevolent Priest says 'I can feel your distress as you defend against this malevolent assault!'
Malevolent Priest begins to cast a spell. <Malevolent Assault>
Malevolent Priest says 'May your soul be torn by this spiteful vexer!'
Malevolent Priest begins to cast a spell. <Malevolent Vex>
Malevolent Priest says 'Our combined powers shall destroy you!'
Malevolent Priest begins to cast a spell. <Coordinated Strike>
Malevolent Priest begins to cast a spell. <Coordinated Strike>
Coordinated Strike: Single Target, Unresistable (0)
1: Decrease Hitpoints by 1500
Malevolent Assault: Single Target, Unresistable (0)
1: Decrease HP when cast by 750
2: Decrease STA by 100
Malevolent Vex: Single Target, Unresistable (0)
1: Decrease Hitpoints by 150 per tick (20 minutes)
2: Increase Curse Counter by 90
Around the two priests are 9x "Constrained Servitor". These mobs are rooted in place and don't attack back. However they have a buff on them called Malevolent Retribution which is a damage shield you cannot dispell. So range them down to activate the priests. Note that the priests will attempt to heal them:
Malevolent Priest says 'We mustn't allow these slaves to be harmed!'
Malevolent Priest begins to cast a spell. <Discordant Light>
Constrained Servitor has been slain by _____!
The constrained servitor is allowed to rest at last. The priests he was serving have been weakened by his death.
Each Servitor death weakens the Malevolent Priests by 10% health. Once all nine are dead, the priests become attackable (both are at 12%).
The Malevolent Priests each hit for a max ~2,000. They do NOT summon and they are NOT aggro-linked, so you can kill them one at a time; however, once one is killed, you have 60 seconds to kill the other one, or else the original gets a resurrection from the remaining priest (it respawns).
Malevolent Priest has been slain by _____!
The Malevolent Priests have been defeated! Though the legion may send replacements, you have finished what you sought out to do and delayed their progress for a time! Congratulations!
Once both priests are dead, 2x "a pile of bones" spawn. The one in the south cubby contains one item of loot. The one in the north cubby contains a "Stained Stone Chalice" for each group member. (used as part of Gates of Discord Progression).
Repeating the Trial
You can repeat the trial at any time by speaking with Maroley Nazuey again:
You say, 'Hail, Maroley Nazuey'
Maroley Nazuey says 'Though you have already completed the second trial, we will allow you to continue to hone your skills in the temple. If you would like to [test your mettle] against the priests again, tell me so, and I will begin preparations for you. You must be warned once more that we have no control over the strength of the beasts that lay inside these temples.'
This leads into the same text as above. Reward: Glyphed Prayer Ring
Reward: Carved Vrex Totem
Reward: Dark Belt of Wrath
Reward: Incantor Mask of Death
Reward: Stained Stone Chalice
Reward: Bloodstone Fragment
Ikkinz Group Trial #3: Tri-Fates (Normal):
Requesting the Expedition
If this is your first time doing this Ikkinz trial, you will need to first speak with Kevren Nalavat (click for map image) in Kod'Taz, the Broken Trial Grounds, as part of Gates of Discord Progression.
If you follow his dialogue and say "Twin Struggles", he directs you to see Kenra Kalekkio (click for map image), who gives out this expedition (/loc -430, -1260, -420 -- in the southeastern corner of the zone are three temples: this is outside northernmost of those temples).
If you've already done progression, you can bypass Kevren Nalavat and speak directly Kenra Kalekkio.
You say, 'Hail, Kenra Kalekkio'
Without progression, you see:
Kenra Kalekkio says 'It would be best if you kept out of sight, _____. You never know when one of those fearsome invaders might wander past looking for a fight. You look like you're here with a purpose, but I can't quite figure out what. Why don't you go see Kevren? He should be more than happy to speak to another adventurer.'
With progression, you see:
Kenra Kalekkio says 'I have been expecting you, _____. You proven your worth thus far by completing the first two trials and for that I applaud you. You are not through with your testing though. You have a [final test] to complete here at the Temple of the Tri-Fates before you will be considered ready for further work.'
You say, 'What final test?'
Kenra Kalekkio says 'Very well. Time is critical, _____. Your final test takes you within the Temple of the Tri-Fates. We call it this because of the three creatures you will encounter once inside. The [three beasts] are hunters that have deadly accuracy with a bow and attack together to make a dangerous combination.'
You say, 'Three beasts?'
Kenra Kalekkio says 'The three hunters inside the temple are called the Tri-Fates. They are named thusly because of their ability to control your fate on a whim. Their victims' usual fate is that of death, though I believe the Wayfarers Brotherhood has recruits that can stand up to them. Perhaps you are that person? Perhaps you have the desire to [prove yourself] worthy, venture into the temple, and slay the beasts?'
You say, 'I'll prove myself'
Kenra Kalekkio says 'Good to hear, but before you go there is more you must know. These hunters are guarding some relics that are giving them extremely high accuracy with their weapons. If they are allowed to possess these relics any longer, they may become an unstoppable force. You must [recover the relics] so the Wayfarers Brotherhood can examine them.'
You say, 'I'll recover the relics'
Kenra Kalekkio says 'This is your final trial and will prove, once and for all, if you are capable of taking on the more serious issues concerning the Muramites. You must fight through the temple and enter an entrance to the inner chambers of the Temple of the Tri-Fates. Once inside, kill the Tri-Fates and return the relics. When you are [ready to begin] and have a group with you, return to me, and I shall send you on your way.'
You say, 'I am ready to begin'
Kenra Kalekkio says 'Then I bid you good luck on your journeys, _____. Make haste into the temple and, hopefully, by the time we meet again you'll have recovered the relics and passed the final test.'
The direction to the entry to your instanced zone(s) have been marked on your compass.
This instance is entered in the temple just south of Kenra.
Lockout Timers
As soon as you request the expedition, you receive a 1-hour lockout timer. If you kill a loot-dropping named in the instance, you receive an 8-hour lockout timer. If you complete the expedition, you receive a 24-hour lockout timer. (All timers are from the point of request.)

Named Mobs
Named mobs that are confirmed to spawn in this instance:
Hexxt Sightsliverer (loot dropper)
Pixtt Tyranist (unknown)
Pixtt Willbreaker (loot dropper)
Subjugated Brawler (unknown)
Named mobs have a chance to be up as soon as you zone in.
Expedition
General mob population here tend to hit for a max ~1,300 while named (loot dropping) mobs tend to hit for a max ~2,100.
Mobs in this zone can drop components to make a Kyv Bow of Precision, if you have a ranger who could use it (Fletching skill).
Here, you'll need to make your way to 3x "Flesh Hunter" (your kill targets for this expedition). Following the main Ikkinz hall way all the way down the first ramp, and into the door with three alcoves. Note that the door remains locked until you've killed the three kyvs in the hallway preceding it and the two ikaavs in front of it.
Inside the main room are 1x "Flesh Hunter" in each of the room's alcoves. The nameds are permanently rooted, summon when damaged, and hit for a max ~1,750. They appear to share aggro.
Kill the three Flesh Hunters one at a time, working from north to south. Keep in mind that due to aggro-sharing, your healers will have lots of aggro on the second and third nameds.
If you fail to kill all three Flesh Hunters within a certain time frame, they respawn.
Flesh Hunter has been slain by _____!
The Tri-Fate Hunters have been defeated! Though the legion may send replacements, you have finished what you sought out to do and delayed their progress for a time! Congratulations!
Once the third Flesh Hunter is dead, the expedition is completed and 2x "a pile of bones" spawn along the opposite wall (one contains loot; the other contains a "Thrice-Notched Arrow Remains" for each group member (used as part of Gates of Discord Progression).
Repeating the Trial
You can repeat the trial at any time by speaking with Maroley Nazuey again:
You say, 'Hail, Kenra Kalekkio'
Kenra Kalekkio says 'Though you have already completed the third trial, we will allow you to continue to sharpen your abilities in the temple. I must remind you that though these trials are for your benefit, we cannot control what goes on inside. If you still want to [prove yourself], tell me, and I will make preparations for you to enter the temple.'
This leads into the same text as above. Reward: Glyphed Prayer Ring
Reward: Crafted Wristband of Strife
Reward: Dark Belt of Wrath
Reward: Incantor Mask of Death
Reward: Platinum Hoop of Disharmony
Reward: Kitren's Tattered Cloak
Reward: Thrice-Notched Arrow Remains
Reward: Manastone Shard
Reward: Glyphed Sandstone
Reward: Kyv Bow of Precision
Ikkinz Raid #1: Chambers of Righteousness (Normal):
Before Raiding
This raid begins with Tublik Narwethar (click for map image) in Kod'Taz (southwestern part of the zone) at about /loc -2000, 1275, -348.
Pre-Requisites for requesting this raid:
- Completion of all three Ikkinz group trials (and respective item turn-ins)
- Completion of Kevren's "Martyrs Passage" quest
- Completion of Tublik's "Crumbled Sanctuary" quest
- Possibly completion of Kevren's "Temple of the Damned" quest (not confirmed)
Pre-Requisites for participating in this raid:
- If below Level 65, must have beaten the Tipt group expedition.
- If Level 65 or higher, there are no known participation requirements.
The instance zone-in is in the northwestern quadrant of the zone. It's the temple due south of the giant temple, so you can have your raid meet there ahead of time while the requester gets the expedition.
Requesting the expedition requires that you be in a raid format (/raidinvite) and have at least six players in the raid (must be online, but don't have to be in the zone; levels don't appear to matter).
If you try to request the raid without pre-requisites, you see:
Tublik Narwethar says 'What is it with you people? Can't you leave a dwarf alone to his work for five minutes without badgering him about this temple or that sanctuary? Give me a break for once and maybe we can talk about it later!'
If you try to request it with less than six people, you see:
I'm sorry, but you don't have enough comrades with you to venture into this dangerous area. Come back when you have at least six groups of friends to join you on this perilous journey.
Summary
- Say "Sanctuary of the Righteous" to trigger the expedition.
- The instanced zone is entered through the south temple in the northwestern quadrant of the zone.
- Inside, Kill 2x "Priest of Righteousness" in the first room on the left.
--- They leash. These are unslowable and infuriate at 50% and 10% (AE rampage).
- Kill the Priest of Righteousness in the room across the hall from this one. It is unslowable and infuriates at 50% and 10% (AE rampage).
- Kill the Defenders of Righteousness in the two rooms further down the hall. These are unslowable and have single-target rampage.
- Open the door to the Arena-type pit. Right behind it is the Custodian of Righteousness.
- Kill the Custodian of Righteousness (unslowable and flurries; hits very fast).
- In the middle of the pit is the Guardian of Righteousness. Once aggro'd, the Crumbling Monuments up top become active.
- Burn the Guardian down as fast as possible. It uses the effect "Throw" (knockback) and "Bury" (has feign-death component)
--- The Crumbling Monuments become inactive after the Guardian dies.
- The Crumbling Monolith at the very top now becomes targettable. Charge it and kill it. Loot the shawl it drops.
- Go past where the Crumbling Monolith stood, down the hallway, and into the crypt where you will find Spirit of Tunik Tamuik.
- Give the shawl to the spirit in order to activate the mob.
- Kill the Spirit of Tunik Tamuik, and loot an artifact off the bones which spawn.
Requesting the Expedition
You say, 'Hail, Tublik Narwethar'
Tublik Narwethar says 'I wasn't expecting you back so soon, _____, but I'm glad you're here. I've been analyzing the glyphs on the last three artifacts you recovered and, the way I read them, it seems the trusik priests used the [four temples] around the Altar of Destruction to gain access to a temple to face some kind of final rite of passage.'
You say, 'Tell me about the four temples'
Tublik Narwethar says 'As you've already uncovered, the Sanctuary of Divine Destruction was used to uncover the purpose for the other three. I believe the Muramites destroyed that temple because it holds the key to the remaining three temples and the artifacts that they hold. Now that we know what's ahead, we can continue forth and unravel this [mystery].'
You say, 'How do we unravel the mystery?'
Tublik Narwethar says 'It's clear to me that you must proceed into each of the three remaining temples and recover the three artifacts that are in them. It's up to you how you want to proceed, but you will have to enter the [Sanctuary of the Righteous], the [Sanctuary of the Glorified], or the [Sanctuary of the Transcendent]. Each one of these holds an artifact that I believe will be used to gain entrance to whatever lies beyond the Altar of Destruction. Which will you choose?'
You say, 'We'll enter the Sanctuary of the Righteous'
Tublik Narwethar says 'The glyphs you recovered show an Artifact of Righteousness that is guarded by a sentinel that is ages old. You will find the Sanctuary of the Righteous to the south of the Altar of Destruction. You must gather a raiding party several times larger than your normal party's size and be prepared for anything. Find an entrance to the inner chambers of the Sanctuary of the Righteous and recover the artifact. May you be gifted with the luck of the brotherhood. I fear you may need it.'
The direction to the entry to your instanced zone(s) have been marked on your compass.
Ikkinz, Chambers of Righteousness is now available to you.
Lockout Timers
Unlike the group expeditions, this raid has no lockout timer upon request. Here, you receive a 12-hour lockout timer upon the death of whichever "Priest of Righteousness" drops stat loot. You receive an additional 12 hours of lockout time upon the death of the "Custodian of Righteousness", an additional 24 hours upon the death of "Guardian of Righteousness", another 12 hours upon the death of "Crumbling Monolith", and another 36 hours upon the death of the "Spirit of Tunik Tamuik" (for a total of four days if you complete the entire expedition).

Named Mobs
Group-quality named mobs that are confirmed to spawn in this instance:
(none confirmed)
Named mobs have a chance to be up as soon as you zone in.
General Mob Population
Base mobs in this zone tend to hit for a max ~1,850 to 2,000. Most are mezzable and stunnable. The three hallway roamers appear to respawn, but no other mobs are known to do so.
Priest of Righteousness
These mobs are tethered to their rooms. One appears where the Diabolic Destroyer does in its expedition; the other two appear where the priests do in the Twin Struggles expedition. They each hit for a max ~2,400 and "infuriate" at 50% and 10% (AE rampage for several rounds).
Priest of Righteousness has been slain by _____!
The Priest of Righteousness topples over to one knee before falling to the ground. He has failed his duties to the Guardian of Righteousness.
You'll get one item of loot out of these three mobs' deaths.
Defenders of Righteousness
Kill 2x "Defender of Righteousness" (one at the end of each hallway extending out of the main hall). These hit for a max ~2,600 and single-target rampage. They don't drop any loot.
Defender of Righteousness has been slain by _____!
The Defender of Righteousness can no longer fulfill its duty to the sanctuary. You are closing ever-nearer to your final destination.
This locks the door to the arena area at the south end of the main hall. Behind it is the "Custodian of Righteousness".
Custodian of Righteousness
The Custodian, unlike other nameds here, is not leashed or rooted. It hits for a max ~1,500; flurries; hits very fast; infuriates at 10% (AE rampage); and has a mem blur effect. It drops one item of loot.
Custodian of Righteousness shifts its weight and turns its attention to someone new. (seen as it mem blurs)
Custodian of Righteousness has been slain by _____!
The Custodian of Righteousness has fallen! Its death has alerted the Guardian of Righteousness to your presence!
Guardian of Righteousness
The Guardian of Righteousness hits for a max ~3,600; is perma-rooted; summons when damaged; has ~500,000 hitpoints; summons adds ("Crumbling Monument") about one every 20 seconds; and casts "Throw"; "Bury"; and "Stone Vortex".
Bury: Single Target, Unresistable (0)
1: Decrease Hitpoints by 6000
2: Feign Death, 87% Success Rate
Stone Vortex: Single Target, Magic (-50)
1: Decrease Hitpoints by 1050
2: Stun (4.00 sec)
Throw: Single Target, Magic (-1000)
1: Decrease Hitpoints by 3000
Guardian of Righteousness motions toward three attackers and throws them wildly around! (casts "Throw" on three targets)
Guardian of Righteousness motions for one of the crumbling monuments to come forth and aid in the attack! (summons add; these hit for a max 1,800 and go non-aggro soon after becoming active)
Guardian of Righteousness slams his fist down, burying the opponent. (casts "Bury")
Guardian of Righteousness has been slain by _____!
As the guardian comes crashing down, a new threat presents itself to you. A crumbling monolith prepares itself to stop you from progressing any further!
It drops one item of loot.
The Crumbling Monolith
The Crumbling Monolith hits for a max ~2,500; is perma-rooted; summons when damaged; and had ~200,000 hitpoints. It drops one rune + "Decaying Spirit Shawl" (turn-in item to activate the final named).
Crumbling Monolith has been slain by _____!
The death of the crumbling monument has caused the stone in this room to stir slightly. You hear the clunking and grinding of stone against stone as something is seemingly unlocked.
Spirit of Tunik Tamuik
Click on the pillar behind the Crumbling Monolith to reveal the path to the crypt. The area is safe, so you can move in.
You have found the hidden entrance to the crypt! The statue moves to the side to allow entrance to the dank hall beyond.
You say, 'Hail, Spirit of Tunik Tamuik'
Spirit of Tunik Tamuik can't see you nor does he know your name. He blinks as he regards you as a trusik. 'You have made it through the trials of this sanctuary. The Guardian of Righteousness was my creation and will be forevermore. It is a ward against those who are not worthy and a test to those trusik priests who believe they can become the highest among priests -- the Vrex. You are most talented to have made it this far. Now, though, it is time for me to rest. I left something with my creations that you should have with you, correct? Hand it to me now.'
When ready for a fight, hand it the "Decaying Spirit Shawl":
Spirit of Tunik Tamuik says 'Just as I expected you to do! Now I can finally rest and you will not be able to stop me!'
Spirit of Tunik Tamuik shimmers momentarily as though he were somehow changing.
It hits for a max ~3,600; is perma-rooted; summons when damaged; and has ~620,000 hitpoints. It drops two items of loot.
Spirit of Tunik Tamuik has been slain by _____!
The Spirit of Tunik Tamuik has been defeated! You have sent his remaining spectral essence to rest. A feeling lingers that he may once again return to defend this sanctuary from evil doers and to continue to test the priests of the trusik people.
"a pile of bones" spawns nearby. It contains 4x "Artifact of Righteousness" (Gates of Discord progression item).
Loot
Possible loot from the Priests and Custodian:
Aegis of Blackscales
Bloodlink Chestmail
Darkglint Blade
Mantle of Mending
Possible loot from the Guardian of Righteousness & Spirit of Tunik Tamuik:
Blackstone of Radical Thought
Cranial Bludgeoner
Fleshthreader's Mace
Onyx Ring of Prayer
Runed Flesh-Banded Leggings
Shining Bloodstone
Taelosian Geomancy Stone Jelki Reward: Aegis of Blackscales
Reward: Bloodlink Chestmail
Reward: Darkglint Blade
Reward: Onyx Ring of Prayer
Reward: Dark Belt of Wrath
Reward: Mantle of Mending
Reward: Incantor Mask of Death
Reward: Fleshthreader's Mace
Reward: Cranial Bludgeoner
Reward: Blackstone of Radical Thought
Reward: Shining Bloodstone
Reward: Runed Flesh-Banded Leggings
Reward: Artifact of Righteousness
Ikkinz Raid #2: Chambers of Glorification (Normal):
Before Raiding
This raid begins with Tublik Narwethar (click for map image) in Kod'Taz (southwestern part of the zone) at about /loc -2000, 1275, -348.
Pre-Requisites for requesting this raid:
- Completion of all three Ikkinz group trials (and respective item turn-ins)
- Completion of Kevren's "Martyrs Passage" quest
- Completion of Tublik's "Crumbled Sanctuary" quest
- Possibly completion of Kevren's "Temple of the Damned" quest (not confirmed)
Pre-Requisites for participating in this raid:
- If below Level 65, must have beaten the Tipt group expedition.
- If Level 65 or higher, there are no known participation requirements.
NOTE regarding past possible crafting requirements: There are NO tradeskill requirements in this raid. ANYONE of any class of any skill level can do the combines in the Glorification raid.
The instance zone-in is the westernmost temple in the zone (due west of the giant temple in the zone's northwestern quadrant), so you can have your raid meet there ahead of time while the requester gets the expedition.
Requesting the expedition requires that you be in a raid format (/raidinvite) and have at least six players in the raid (must be online, but don't have to be in the zone; levels don't appear to matter).
If you try to request the raid without pre-requisites, you see:
Tublik Narwethar says 'What is it with you people? Can't you leave a dwarf alone to his work for five minutes without badgering him about this temple or that sanctuary? Give me a break for once and maybe we can talk about it later!'
If you try to request it with less than six people, you see:
I'm sorry, but you don't have enough comrades with you to venture into this dangerous area. Come back when you have at least six groups of friends to join you on this perilous journey.
Summary
Warning to high level players: The final encounter in this expedition involves mobs that split at health-based points. If you kill the mob before it has a chance to realize it's passed its health check, you won't be able to complete the raid.
- The same person needs to loot the glyphs from this raid (no known skill requirements needed).
- Kill the Pixtt Assault Ward beyond the first door (hard hitter).
- Kill 2x "Visionary of Glory" in the first room on the left (leashed to the room; unslowable; AE rampage at 50% and 10%).
- Kill 1x "Visionary of Glory" in the room across the hall (same room where Diabolic Destroyer spawns).
--- Each of the Visionaries drops a rune (for research use).
- Move down the hallway, past the other doors and arena, and down the ramp to another large doorway.
- In this room, kill the Pixtt Condemner (casts an unresistable AE silence).
--- Have the same person loot the container it drops.
- At the door in the opposite end of the room is "Sentinel of Glorification" (AE fling effect + feign death effect).--- Have your looter get the Rune from its corpse.
- The researcher who looted the items needs to do some combines:
--- Inside the "Faded-Glyph Tablet", combine "Runed Glyph: Niliktek" + "Runed Glyph: Fexika" + "Runed Glyph: Aktek" to produce "Axtekilitek"
------ "Axtekilitek" is the key to open the door at the bottom of the ramp.
--- Inside the "Faded-Glyph Tablet", combine "Axtekilitek" + "Runed Glyph: Kruxek" to produce "Kruxilitek".
- Use the "Kruxilitek" to open the door behind the Sentinel (keep the item for later)
- Move past the Sentinel's spawn point, and down the hallway to the right (you can slip by many of the mobs in the feasting den).
- Make sure all trash mobs in the area of the Glorification room are killed, including roamers. They make for a rude interruption to the rest of the raid.
- Have your looter turn in the "Kruxilitek" to the Guardian of Glorification to trigger its actvity (Guardian procs "Throw").
- Once the Guardian hits 50%, it will split into two guardians.
--- WARNING: If you're a high level doing this raid, make sure you let the Guardian split (if you kill it, you'll have to repeat the raid).
--- If you need a break at this point, you can move your raid out of the room and have them leash, to allow you some recovery time.
- Upon the first split, the six hornblowers standing on top of the horns behind the Guardian become attackable (these don't fight back, even at melee range).
- Each of the split Guardians, when at 50% health, splits into two more Guardians.
- Upon the death of all Guardians, a pile of bones spawns with the artifacts (looted as part of progression).
Requesting the Expedition
You say, 'Hail, Tublik Narwethar'
Tublik Narwethar says 'Welcome back, _____. You've recovered one of the three artifacts from the three remaining sanctuaries. You still have to visit the [Sanctuary of the Glorified] and the [Sanctuary of the Transcendent] and recover the two artifacts still remaining there. Which would you like to proceed with?'
You say, 'We'll enter the Sanctuary of the Glorified'
Tublik Narwethar says 'The glyphs you recovered show an Artifact of Glorification that is guarded by a sentinel that is ages old. You will find the Sanctuary of the Glorified to the west of the Altar of Destruction. You must gather a raiding party several times larger than your normal party's size and be prepared for anything. Enter an entrance to the inner chambers of the Sanctuary of the Glorified and may luck be your path.'
The direction to the entry to your instanced zone(s) have been marked on your compass.
Ikkinz, Chambers of Glorification is now available to you.
Lockout Timers
Unlike the group expeditions, this raid has no lockout timer upon request. Here, you receive a 12-hour lockout timer upon the death of whichever "Visionary of Glory" drops stat loot. You receive an additional 12 hours of lockout time upon the death of the "Sentinel of Glorification", and another 3 days upon the death of the "Guardian of Glorification" encounter (for a total of four days if you complete the entire expedition).

Named Mobs
Group-quality named mobs that are confirmed to spawn in this instance:
Coerced Tiv Chanter
Subjugated Vrex Caller
Subservient Punisher
Named mobs have a chance to be up as soon as you zone in.
General Mob Population
Base mobs in this zone tend to hit for a max ~1,850 to 2,000. Most are mezzable and stunnable.
Pixtt Assault Ward
The Pixtt Assault Ward is right inside the first door. She hits for a max ~3,000; frequently single-target rampages; summons when damaged; is NOT tethered; summons two standard ukun pets; and procs "Grasp of Muram" and "Trample". She has about 150,000 hitpoints.
Pixtt Assault Ward has been slain by _____!
Pixtt Assault Ward's corpse has failed on its mission to halt your progress.
Visionaries of Glory
These hit for a max ~2,550 and each have ~150,000 hitpoints. At 50% and 10% health, they "infuriate" (AE rampage for several rounds before calming down). They also proc "Strike of Glory":
Strike of Glory: Single Target, Unresistable (0)
1: Decrease Hitpoints by 30
2: Feign Death, 87% Success Rate
Visionary of Glory has been slain by _____!
Visionary of Glory's corpse chokes on blood as it collapses to the ground.
Each Visionary of Glory drops a Runed Glyph. The same person should loot each.
Pixtt Condemner
The Pixtt Condemner hits for a max ~2,900 and has ~240,000 hitpoints. It is a cleric, and will heal itself. It is NOT tethered (can be pulled). It casts a targeted 80' range AE called "Silence of the Shadows":
Silence of the Shadows: Targeted AE 80', Unresistable (0)
1: Silence
Pixtt Condemner has been slain by _____!
Pixtt Condemner's corpse risked its life to defeat you and failed.
This mob drops a container. Whoever looted the Runed Glyphs should loot it, and then combine the three Runed Glyphs in the container to produce a key called "Axtekilitek". Hold the "Axtekilitek" on your cursor, stand in front of the door where the Pixtt Condemner was, and click "u" to unlock it.
The glyphs on Axtekilitek and the door glow momentarily before the doors slide open.
Sentinel of Glorification
The Sentinel of Glorification is found at the door on the opposite end of the next room. Clear the room of mobs, and then engage the Sentinel. It hits for a max ~3,000; has ~350,000 hitpoints; flurries; and procs "Fling" (knockback) and "Bury" (feign death).
Bury: Single Target, Unresistable (0)
1: Decrease Hitpoints by 6000
2: Feign Death, 87% Success Rate
Fling: AE PC v1 200', Unresistable (0)
1: Decrease Hitpoints by 1
Sentinel of Glorification has been slain by _____!
Sentinel of Glorification's corpse crumbles into rock heaps upon the ground.
This mob drops a Runed Glyph. Inside the same container, combine this Runed Glyph with the Axtekilitek to produce a key called "Kruxilitek". Use the same process to open up the locked door.
Kruxilitek seemingly melds to the door before falling back into your hand. The door opens with ease.
Guardian of Glorification
In the Guardian's room, none of the event mobs are active, so you can clear the base population with no problem. After trash mobs are clear, pay a visit to the Guardian.
You say, 'Hail, Guardian of Glorification'
Guardian of Glorification ignores your hail. It is as if it lacks the life-force needed to move. Perhaps you have something with you that might awaken it.
Whoever has the "Kruxilitek" should now hand it to the Guardian (be ready for a fight).
Guardian of Glorification comes alive with the power of Kruxilitek!
Warning to high level players: This encounter involves mobs that split at health-based points. If you kill the mob before it has a chance to realize it's passed its health check, you won't be able to complete the raid.
The Guardian hits for a max ~3,700 and will require ~320,000 hitpoints of damage to bring it to 50%. It single-target rampages; is perma-rooted; summons when damaged; and casts "Throw" (three targets at a time) and "Manabolt".
Guardian of Glorification tosses its foes away wildly! ("Throw")
Throw: Single Target, Magic (-1000)
1: Decrease Hitpoints by 3000
Guardian of Glorification lets loose a bolt of energy toward his enemy! (Manabolt)
Manabolt: Single Target, Unresistable (0)
1: Decrease Mana by 1500
In addition, the enthralled listeners in the room will proc "Fling" on people (knockback).
Fling: AE PC v1 200', Unresistable (0)
1: Decrease Hitpoints by 1
When it reaches 50% health, it splits into two mobs:
Guardian of Glorification splits into two smaller stone workers!
The new 2x "Guardian of Glorification" each hit for a max ~3,000 and are NOT perma-rooted, but are leashed to the room (you can leash them and take a rest period at this time, if you need). The split mobs have the same spell attacks as the original.
Also at this time, the 6x "Glorified Bolsterer" above the horns go live. If left alone, they boost the Guardians' power and health:
The sounds of power emanate from the right set of horns.
The sounds of life emanate from the center set of horns.
They can be attacked. These each have ~75,000 hitpoints and can be range DPS'd (they don't summon). As the split versions of the Guardians don't see invisibility, you can actually invis and levitate your way to the Glorified Bolsterers to melee them to death (they don't fight back) without aggro'ing the Guardians.
The 2x "Guardian of Glorification" will each split once again at 50% health (for a total of four more Guardians -- it will take ~85,000 hitpoints of damage to bring one to 50% health). The 4-split Guardians each hit for a max ~2,000; have ~85,000 hitpoints each; and have the same spell attacks as the original.
Guardian of Glorification has been slain by _____!
The Guardian of Glorification has been defeated! This massive stone golem is a testament to the ancient trusik geomancy powers and you have been powerful enough to defeat it. Congratulations on completing a difficult deed.
"a pile of bones" spawns next to the horns. It contains 4x "Artifact of Glorification" (Gates of Discord progression item).
Loot
The Visionary of Glory and Sentinel of Glorification each drop one item of loot:
Aegis of Blackscales
Bloodlink Chestmail
Darkglint Blade
Mantle of Mending
Each of the 4-split "Guardian of Glorification" mobs drops one item:
Deathcaller's Stonewind
Deathwrap of Rites
Jagged Onyx Staff
Jointed Scale Greaves
Rageshale of Bolstering
Shale Shoulderpads Reward: Aegis of Blackscales
Reward: Bloodlink Chestmail
Reward: Darkglint Blade
Reward: Deathwrap of Rites
Reward: Rageshale of Bolstering
Reward: Shale Shoulderpads
Reward: Jointed Scale Greaves
Reward: Dark Belt of Wrath
Reward: Jagged Onyx Staff
Reward: Deathcaller's Stonewind
Reward: Mantle of Mending
Reward: Incantor Mask of Death
Reward: Artifact of Glorification
Ikkinz Raid #3: Chambers of Transcendence (Normal):
Before Raiding
This raid begins with Tublik Narwethar (click for map image) in Kod'Taz (southwestern part of the zone) at about /loc -2000, 1275, -348.
Pre-Requisites for requesting this raid:
- Completion of all three Ikkinz group trials (and respective item turn-ins)
- Completion of Kevren's "Martyrs Passage" quest
- Completion of Tublik's "Crumbled Sanctuary" quest
- Possibly completion of Kevren's "Temple of the Damned" quest (not confirmed)
Pre-Requisites for participating in this raid:
- If below Level 65, must have beaten the Tipt group expedition.
- If Level 65 or higher, there are no known participation requirements.
Requesting the expedition requires that you be in a raid format (/raidinvite) and have at least six players in the raid (must be online, but don't have to be in the zone; levels don't appear to matter).
If you try to request the raid without pre-requisites, you see:
Tublik Narwethar says 'What is it with you people? Can't you leave a dwarf alone to his work for five minutes without badgering him about this temple or that sanctuary? Give me a break for once and maybe we can talk about it later!'
If you try to request it with less than six people, you see:
I'm sorry, but you don't have enough comrades with you to venture into this dangerous area. Come back when you have at least six groups of friends to join you on this perilous journey.
Summary
- Here, you'll encounter "Guardian of Transcendence" in four seperate encounters:
--- At the zone-in.
--- At the base of the ramp from the main hallway.
--- Outside the door that leads to the dining area.
--- In a locked area further down that same hall.
- You will only be able to handle the first three encounters. To engage the fourth, you'll need a key.
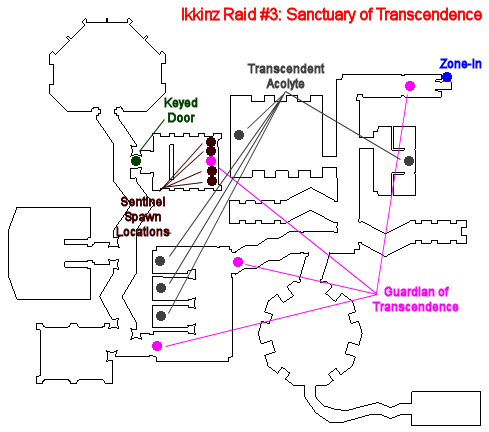
- Kill 5x "Transcendent Acolyte" scattered around the zone.
--- Found at the Diabolic Destroyer's spawn point; the Twin Struggles room; and the Tri-Fates Hunter spawn points.
--- Have one person loot the rock essences from them (four rocks and one container).
--- NOTE: This key is reported as buggy (not always working). To be sure it will work, have the looter be the same person who requested the expedition (who should be all up to date on their progression).
--- Combine the four Rock Essences inside the container to produce a "Solid Glyphed Essence".
--- With the Solid Glyphed Essence on your cursor, go right up against the locked door and click "U" to open it.
- Kill the fourth "Guardian of Transcendence" to spawn 4x "Vrex Xalkax`s Sentinel" (appear at kill point and immediately aggro).
- The Sentinels are line-of-sight aggro, so pull carefully.
- Golems must be killed by a specific class, according to an emote they give:
--- Brute force and brawn - Warrior
--- Cringe at the appearance of talismans - Shaman
--- Deep gashes of feral savagery - Beastlord
--- Doom of death - Necromancer
--- Dread of celestial spirit - Cleric
--- Dreads the strike of dead - Shadowknight
--- Focused tranquility - Monk
--- Foreboding melody - Bard
--- Holy blade - Paladin
--- Ignores anything behind it - Rogue
--- Mind and body vulnerable - Enchanter
--- Falters when struck with the power of the elements - Wizard
--- Shies from heavy blades - Berserker
--- Summoned elements - Magician
--- The creature seems weak in the face of the power of nature - Druid
--- True shots and fast blades - Ranger
- Upon the death of the final folem, "Vrex Xalkax`s Marauder" spawns.
--- Has an AE DD for 3,000; must be killed by a specific type of class, based on an emote it gives (this emote changes every ~45 seconds):
------ Cannot stand the power of healers - Priests
------ Combined strength and ingenuity - Hybrids
------ Strength of intelligent magic - Casters
------ Strength and cunning - Melees
- Now head to the boss of the trial, "Vrex Xalkak Nixki".
--- Prior to aggro, he fluctuates between 5% and 100% health.
------ You can engage him at any point; obviously, however, it's better the lower in health he is.--- He procs Rain of Stone (AE DD for 1,500) and Grip of Stone (500 hp+mana/tick DoT)
- After he is dead, loot the artifact from the pile of bones that spawns.
Requesting the Expedition
You say, 'Hail, Tublik Narwethar'
Tublik Narwethar says 'Welcome back, _____. You've recovered two of the three artifacts from the three remaining sanctuaries. You still have to visit the [Sanctuary of the Transcendent] and recover the artifact still remaining there. Are you ready to proceed with the remaining sanctuary?'
You say, 'We'll enter the Sanctuary of the Transcendent'
Tublik Narwethar says 'The glyphs you recovered show of an Artifact of Transcendence that is guarded by a sentinel that is ages old. You will find the Sanctuary of the Transcendent to the north of the Altar of Destruction. You must gather a raiding party several times your normal party's size and you should be prepared for anything. Enter an entrance to the inner chambers of the Sanctuary of the Transcendent and may luck be a companion through the toils ahead.'
The direction to the entry to your instanced zone(s) have been marked on your compass.
Ikkinz, Chambers of Transcendence is now available to you.
Lockout Timers
Unlike the group expeditions, this raid has no lockout timer upon request. Here, you receive a 12-hour lockout timer upon the death of the first loot-dropping "Transcendent Acolyte" and an additional 12 hours for a second loot-dropping "Transcendent Acolyte". You receive an additional 24 hours of lockout time upon the death of the "Guardian of Transcendence", and another 48 hours upon the death of "Vrex Xalkak Nixki" (for a total of four days if you complete the entire expedition).
Named Mobs
Group-quality named mobs that are confirmed to spawn in this instance:
Pixtt Airstrangler
Pixtt Willbreaker (loot dropper - appears as a roamer)
Named mobs have a chance to be up as soon as you zone in.
General Mob Population
Base mobs in this zone tend to hit for a max ~1,850 to 2,000. Most are mezzable and stunnable.
Guardian of the Transcendence #1
The first time you encounter the Guardian is at the zone-in. This mob is permanently rooted; summons when damaged; hits for a max ~2,600; flurries; procs "Throw" (knockback + dmg); and has ~312,000 hitpoints. As it reaches 90% health, it goes inactive (will take about 30,000 dmg to bring it to 90% health) and the door behind it unlocks:
Guardian of Transcendence crumbles to dust upon the ground, but you have the feeling that you haven't seen the last of it yet.
Guardian of the Transcendence #2
At the end of the main hallway, down the ramp, you'll find the Guardian again. It has the same abilities as before. This time, take it to 75% health:
Guardian of Transcendence crumbled once again into a pile of dust. Like before, you feel like you haven't seen the last of it.
Guardian of the Transcendence #3
Behind the door and on the opposite end of this room is the Guardian again. This time, take it to 50% health:
Guardian of Transcendence crumbles once more to dust at your feet. Its presence remains, though. It is no doubt waiting for you.
Transcendent Acolytes
There are 5x "Transcendent Acolyte" you need to kill. They each hit for a max ~2,800 and "infuriate" at 50% and 10% health (AE rampage for several rounds before settling down).
Transcendent Acolyte has been slain by _____!
The acolyte was only a diversion, but important nonetheless. You must forge ahead to uncover the mysterious glimpses you've seen of the Guardian of Transcendence.
Each of these mobs drop a "Rock Essence" (five different items of the same name, one of which is a container). Have the same person loot all items, and then combine them to produce a "Solid Glyphed Essence".
Move up to the locked area containing the last Guardian encounter, hold the Solid Glyphed Essence on your cursor, and click "U":
The solid glyphed essence forms to an opening in the door and energy creeps out through the door like a swarm of spiders. The energy recedes in an instant and the door slides open.
Guardian of Transcendence #4
Behind the locked door is a room full of golems, one of which is the Guardian of Transcendence at 50% health. Note that because the Guardian is rooted and at 50%, be prepared to get summoned by it as soon as you generate any aggro in the room.
Clear the room of mobs, and then engage the Guardian, DPSing it dead this time. As soon as it dies, five mobs spawn at its death location: 1x "Vrex Xalkak Nixki" (non-aggro) and 4x "Vrex Xalkak`s Sentinel" (aggro).
Guardian of Transcendence has been slain by _____!
The death of the Guardian of Transcendence reveals a trusik geomancer! It appears he was the guardian all along and used his phenomenal abilities to lure you into his den!
Vrex Xalkak Nixki says 'I won't be defeated so easily! Come forth, my sentinels! Your time to work is at hand!'
Vrex Xalkak`s Sentinels
Each Sentinel has apparent line-of-sight aggro. They each hit for a max ~2,100; single-target rampage; and proc "Grip of Stone".
Grip of Stone: PB AE 125', Chromatic (-300)
1: Decrease Hitpoints by 500 per tick
2: Decrease Mana by 500 per tick
These Sentinels must be killed by a specific class, according to an emote they give at very low health:
Brute force and brawn - Warrior
Cringe at the appearance of talismans - Shaman
Deep gashes of feral savagery - Beastlord
Doom of death - Necromancer
Dread of celestial spirit - Cleric
Dreads the strike of dead - Shadowknight
Focused tranquility - Monk
Foreboding melody - Bard
Holy blade - Paladin
Ignores anything behind it - Rogue
Falters when struck with the power of the elements - Wizard
Shies from heavy blades - Berserker
Summoned elements - Magician
The creature seems weak in the face of the power of nature. - Druid
The creature's mind and body are vulnerable. - Enchanter
The creature's skin seems vulnerable to a true shot and fast blades. - Ranger
NOTE: As you're fighting the sentinels, Vrex Xalkak Nixki (non-aggro) will be casting "Mana Drain" and "Throw" on random targets.
Mana Drain: Single Target, Magic (0)
1: Decrease Mana by 15 (L1) to 510 (L100)
Throw: Single Target, Magic (-1000)
1: Decrease Hitpoints by 3000
Failure on the appropriate class kill results in an immediate respawn at full health:
Your skills were insufficient to defeat the sentinel!
It is reforming to come at you again!
NOTE: The golems seem to retain the same emote, so you can take note of what class is required and have only that class DPS it. The golems appear to only select classes based on who is in the zone, so if you don't have any of one class, you don't have to worry about it being bugged.
With the appropriate class kill, you see this:
The sentinel's rubble drops to the ground. It has been defeated.
Vrex Xalkak`s Sentinel has been slain by _____!
Upon the death of the last Sentinel, "Vrex Xalkek`s Marauder" immediately spawns upon its corpse and goes aggro.
Vrex Xalkak`s Marauder
"Vrex Xalkak`s Marauder" hits for a max ~2,800; single-target rampages; and casts "Cataclysm of Stone".
Cataclysm of Stone: PB AE 150', Chromatic (-350)
1: Decrease Hitpoints by 3000
The Marauder must be killed by a certain class type, otherwise it instantly respawns at full health:
Cannot stand the power of healers - Priests
Combined strength and ingenuity - Hybrids
Strength and cunning - Melees
The creature will perish under the strength of intelligent magic. - Casters
Vrex Xalkak`s Marauder has been slain by _____!
The marauder's remains crash to the ground. It is no more.
Vrex Xalkak Nixki
Vrex Xalkak Nixki fluctuates between 100% and 5%. Engage him at 5% if you can, to make for a quick fight. He hits for a max ~3,000 and procs "Rain of Stone" and "Grip of Stone". He has about 2.6 million hitpoints (~130,000 hp to be killed if you get him at 5% health).
Grip of Stone: PB AE 125', Chromatic (-300)
1: Decrease Hitpoints by 500 per tick
2: Decrease Mana by 500 per tick
Rain of Stone: Targeted AE 125', Chromatic (-300)
1: Decrease Hitpoints by 1500
Vrex Xalkak Nixki has been slain by _____!
Vrex Xalkak Nixki has been defeated! The whole time you were led to believe that this guardian was just another stone sentinel left as a test by the trusik priests of the past. Congratulations on a most difficult task indeed!
"a pile of bones" spawns under the table in the room. In it are 4x "Artifact of Transcendence" (Gates of Discord progression item).
Loot
Two of the "Transcendent Acolyte" mobs will drop one item each:
Aegis of Blackscales
Bloodlink Chestmail
Darkglint Blade
Mantle of Mending
The "Guardian of Transcendence" and "Vrex Xalkak Nixki" each drop two items of loot:
Blackstone Buckler
Bloodstone Sword
Coldstone of Continuance
Flamestone of the Arcane
Irestone Band of Rage
Ritual Spinesplicer Reward: Aegis of Blackscales
Reward: Bloodlink Chestmail
Reward: Darkglint Blade
Reward: Dark Belt of Wrath
Reward: Blackstone Buckler
Reward: Bloodstone Sword
Reward: Mantle of Mending
Reward: Incantor Mask of Death
Reward: Ritual Spinesplicer
Reward: Flamestone of the Arcane
Reward: Coldstone of Continuance
Reward: Irestone Band of Rage
Reward: Artifact of Transcendence
Ikkinz Raid #4: Chambers of Destruction (Normal):
Before Raiding
Before you even think about doing this raid:
- You'll need a Rogue that can pickpocket (unknown skill check)
--- Alternatively, any class can use a Level 70 Goblin shroud to do so (this is confirmed as working).
- You'll need a caster with a Spell Research Kit (no skill required - container must hold at least four items).
- You'll need a priest with a Sewing Kit (no skill required - container must hold at least four items).
Pre-Requisites for requesting this raid:
- Completion of all three Ikkinz group trials
- Completion of Kevren's "Martyrs Passage" quest
- Completion of Kevren's "Temple of the Damned" quest
- Completion of Kevren's "Summoner Ring" quest
- Completion of Tublik's "Pit of the Lost" quest
- Completion of Tublik's "Crumbled Sanctuary" quest
- Completion of the "Icon of the Altar" quest
--- Must have the item "Icon of the Altar" on you to request.
Pre-Requisites for participating in this raid:
- If below Level 65, must have beaten the Tipt group expedition.
- If Level 65 or higher, there are no known participation requirements.
Requesting the expedition requires that you have at least six players in your group or raid. Unlike the first three Ikkinz raid, you do NOT have to be in raid format, and offline players count towards the total.
If you try to request the raid without pre-requisites, you simply get ignored by the Sentinel of the Altar (it has no hail response either way).
Summary
- Give your "Icon of the Altar" to the "Sentinel of the Altar" to trigger the expedition.
- Have your Rogue pickpocket the "Stalwart Caretaker" guarding the entrance.
--- Rogue should turn in the "Runic Inscription" to the Caretaker to open the door.
- Kill the two Altar Wardens (one in Twin Struggles room; one in Diabolic Destroyer room).
--- Caster researcher should loot the two Runed Glyphs from their corpses.
- Use the Runed Glyphs to open the next set of doors.
- Kill the two Altar Sentries (one in either hall).
--- Altar Sentries will emote according to which class type should kill it (caster, priest, hybrid, or melee).
--- Caster researcher should loot the two Runed Glyphs from the "a pile of bones" that spawn.
- Caster researcher should combine the four Runed Glyphs in a Spell Research Kit to create an Engraved Rune.
--- Engraved Rune will open the door to the arena (this is the room at the south end of the main hall).
- Kill the Altar Overseer (expect adds).
--- Loot the Geostone from its corpse to open the next door.
- Have a priest (with a Sewing Kit container) speak with the Phantasmal Priest.
--- Minor combine, followed by "north" and "south" to pick up ground spawns.
--- Turn in ground spawns to the two golems to make them aggro, then kill them.
- Move through the door and kill the two Curate Firetenders.
- Down the hall in the Glorification room is the Oracle of the Altar. Kill it.
--- Loot the drum from the Oracle's corpse (key to the next room).
- In the next room down the hall is the Altar Construct. Kill this (expect adds).
- Finally, fight and kill the Keeper of the Altar in the last room (expect many, many adds to be mostly kited while burning down the named).
Requesting the Expedition
This raid expedition is triggered by giving your "Icon of the Altar" to the "Sentinel of the Altar". This is a golem at the top of the giant temple in the northwestern part of Kod'Taz.
The Sentinel of the Altar motions for you to enter the altar through the entrance behind him.
To enter the instanced zone, head down the tunnel directly behind the Sentinel of the Altar and hang a right at the bottom of the ramp. Your compass should handle the rest.
LOADING, PLEASE WAIT...
You have entered Ikkinz, Antechamber of Destruction.
Lockout Timers
Unlike the group expeditions, this raid has no lockout timer upon request. Here, you receive a 12-hour lockout timer for each Altar Warden and each Altar Sentry (total: 48 hours for the four). You receive an additional 12 hours of lockout time upon the death of the "Altar Overseer", an additional 24 hours upon the death of "Oracle of the Altar", and another 48 hours upon the death of the "Keeper of the Altar" (for a total of four days if you complete the entire expedition).

Named Mobs
Group-quality named mobs that are confirmed to spawn in this instance:
Scorned Trusik Dissident (loot dropper - appears in crypt behind the arena)
Named mobs have a chance to be up as soon as you zone in.
The Caretaker
You say, 'Hail, Stalwart Caretaker'
The stone worker does not move. It almost seems not to have any purpose at all, yet it blocks the door behind it.
There is a magical force preventing you from opening this door.
A Rogue (or Goblin Rogue Level 70 Shroud) should pickpocket it until they receive a "Runic Inscription". Hand it the item:
Stalwart Caretaker motions towards the door behind it. You have passed the first test.
Stone grinds against stone and the door slides open.
At this time, you also receive a message in flash text:
Only research can solve the mystery of the runed glyphs. (Only a pure caster should loot the runes here.)
Altar Wardens
Kill the Altar Wardens in the first rooms encountered (one is inside the left [Twin Struggles] room and the other is inside the right [Diabolic Destroyer] room).
Each hits for a max ~2,500; has ~350,000 hitpoints; single-target rampages; randomly mem blurs itself; and casts "Fling" (knockback), "Throw" (dmg+knockback), "Bury" (feign death), and "Stone Explosion" (dmg proc). They are tethered to their rooms (reset health, aggro, and debuffs if pulled outside).
Altar Warden has been slain by _____!
Altar Warden's corpse crumbles to pieces almost instantly. Whatever is the driving force behind this creature must be siphoning the energy back into itself.
Between them, they drop "Runed Glyph: Noxit" and "Runed Glyph: Aexit". Have your designated researcher loot the runes from the Wardens. These runes are used to open the next two doors in the main hallway (Noxit opens the east door; Aexit opens the west door).
Dust falls around you as the glyphed rune causes the door to shake and open.
The runes on the glyph cause the door to open without any hesitation.
Altar Sentries
Altar Sentries hit for a max ~2,750; single-target rampage; mem blur; and cast "Earth Wave" and "Strike of Glory". They each have ~390,000 hitpoints.
Each Altar Sentry gives off an emote indicating who needs to get the kill shot:
Combined strength and ingenuity (Hybrids)
Strength and cunning (Melees)
The creature cannot stand up to the power of healers. (Priests)
The creature will perish under the strength of intelligent magic. (Casters)
Altar Sentry has been slain by _____!
The stone worker crumbles to the ground, its energy drained.
Each Altar Sentry, upon death, spawns "a pile of bones". This 'mob' drops "Runed Glyph: Grexit" and "Runed Glyph: Truxit" between them. Have the researcher loot these items.
The researcher needs to combine the four runes in a Spell Research Kit to produce "Engraved Rune" which will unlock the arena door.
You hold the Engraved Rune up to the door. The magic on the door recognizes the rune and opens for you.
Altar Overseer
Next up is a battle in the arena/pit room. The Altar Overseer is your target. Upon engaging, the Altar Monuments become active. If you keep your raid close to the center with the Overseer, you may reduce the amount of adds you get. Be prepared to kite them.
The Altar Overseer hits for a max ~4,100; single-target rampages; and casts "Bury" (feign death + 6,000 single-target DD), "Throw" (single-target DD for 3,000) and "Rain of Stone" (AE for 1,500). It may also mem blur a bit and summon other targets to its location.
Altar Overseer has been slain by _____!
Altar Overseer's corpse crumbles to pieces almost instantly. Whatever is the driving force behind this creature must be siphoning the energy back into itself.
Once the Overseer is dead, the Monuments become inactive. The Overseer drops an "Overseer's Geostone" and one item of stat loot. The Geostone is used to open the next door (doesn't matter who loots this).
The Phantasmal Priest
Head through the locked door west of the arena, and see the Phantasmal Priest (non-aggro at this time).
You say, 'Hail, Phantasmal Priest'
Phantasmal Priest says 'You seek to move beyond this door, yet I cannot allow that until someone with a like mind as me comes forward. Only they will understand the calling and only they can do what is necessary to proceed. If there be anyone who matches my ambitions, step forward to [answer the challenge].'
You say, 'I will answer the challenge!'
If you're not a priest, you see:
Phantasmal Priest says 'You are not of a similar mind as me. You will not understand the hardships. Be gone.'
If you're a priest, you see:
Phantasmal Priest says 'You are a priest. It is your ability -- in fact, your very calling -- that requires you to be able to manipulate it. You must sew these together and return to me the product so that I can verify the truth in your words and in your soul.'
You receive 4x "Dried Segment of Flesh". Combine these in a Sewing Kit (no skill required) to create a "Parchment of Flesh". Hand in this item.
Phantasmal Priest says 'Well done, _____. You have proven you are indeed the priest you claimed to be. This test is not yet over though. As a priest, you must be able to command stone. Before you can command them, you must find that which they lack. You must look to the [north] and to the [south]. Speak return and you shall be back.'
Say "north" to be ported to a small room with a ground spawn in it. Pick up "Stone Fragment", and then with nothing targeted, /say "return" to be ported back to the NPC. Repeat again with "south" for another "Stone Fragment".
Hand the "Stone Fragment" to each of the Guardians:
The guardian stirs slightly before settling down.
The two guardians come alive as the priest disperses! Your attempt at commanding them has failed!
The Priest, himself, disappears, while the 2x "Phantasmal Priest Guardian" mobs attack. These each hit for a max ~2,600 and frequently cast "Earthen Shrapnel" (an AE for ~500). They also cast "Fling" (AE knockback). Each has about 250,000 hitpoints. Kill them both, and then make your way down to the feasting den.
Phantasmal Priest Guardian has been slain by _____!
Phantasmal Priest Guardian's corpse cannot sustain itself anymore and crashes to the ground.
The Firetenders
The two Curate Firetenders each hit for a max ~2,500 and has about 200,000 hitpoints. They proc "Fire Burst" and AE the spell "Flames of the Fiend" (AE for ~2,700 dmg).
Curate Firetender has been slain by _____!
Curate Firetender's corpse is burned by embers before finally laying dead upon the ground.
Have someone with an open container slot loot the Glowing Chunks of Coal from their corpses. They'll have to loot a container further into the event.
Oracle of the Altar
You can range-kill the two Altar Sustainers behind the Oracle of the Altar. If you do this, be prepared for the Oracle to charge at you. It's leashed to the room, but may get a few hits in on people before it leashes.
Kill the Oracle of the Altar. It hits for a max ~2,900; flurries; has ~500,000 hitpoints; and AEs "Throw".
Oracle of the Altar has been slain by _____!
Oracle of the Altar's corpse crumbles to pieces almost instantly. Whatever is the driving force behind this creature must be siphoning the energy back into itself.
It drops a container called "Stone Drum of Cohesion" which needs to be looted by the person who looted the Glowing Chunks of Coal. Combine the Coals inside this container to produce a "Fused Trusik Signet". This key opens the next door.
The door reacts to the signet's aura. The ground trembles as the door opens.
Altar Construct
Be prepared for many, many adds with the Altar Construct. You'll want a few kiters prepared to handle the adds while the rest of the raid kills the Construct.
The Altar Construct hits for a max ~3,000; has ~550,000 hitpoints; single-target rampages; and casts "Crumbling Stone", "Cataclysm of Stone", and "Earthen Shrapnel". It spawns emote-based adds (waves of four at a time):
Altar Construct trembles violently as lesser constructs emerge from the ground.
This signals the spawn of 4x "Lesser Altar Construct" (hits for a max ~1,600 each; each has ~30,000 hitpoints).
Once the Altar Construct is dead, you can leash the adds.
Altar Construct has been slain by _____!
As the construct falls, you sense that a very powerful protector of the altar is waiting for you.
Keeper of the Altar
The Keeper of the Altar is found in the next room over. It's permanently rooted in place (summons when damaged); is immune to slow; hits for a max ~3,000; has approximately 1 million hitpoints; AE rampages; procs "Earth Wave" and "Kneeshatter"; and casts "Throw", "Bury", and "Earthen Shrapnel".
Earth Wave: PB AE 100', Prismatic (-350)
1: Decrease HP when cast by 1350
2: Stun (1.00 sec)
Kneeshatter: Single Target, Unresistable (-100)
1: Decrease HP when cast by 400
2: Decrease Movement Speed by 50%
3: Decrease Endurance by 600
4: Increase Poison Counter by 18
Bury: Single Target, Unresistable (0)
1: Decrease Hitpoints by 6000
2: Feign Death, 87% Success Rate
Earthen Shrapnel: PB AE 100', Magic (-300)
1: Decrease Hitpoints by 500
Throw: Single Target, Magic (-1000)
1: Decrease Hitpoints by 3000
It also spawns numerous adds, in waves of 11 at a time (10x "Altar Assailant" + 1x "Altar Adherent"):
Keeper of the Altar quakes violently as lesser assailants form from the ground to join in battle!
The Assailant adds hit for a max ~1,100. If kited, they will fall to the ground:
The assailant runs out of energy and crumbles to the ground.
The Adherent add hits for a max ~2,000 and is immune to slows. Adherents have the same kill requirements as the Altar Sentries you encountered earlier:
Combined strength and ingenuity (Hybrids)
Strength and cunning (Melees)
The creature cannot stand up to the power of healers. (Priests)
The creature will perish under the strength of intelligent magic. (Casters)
Keeper of the Altar has been slain by _____!
The Keeper of the Altar has been defeated! You have found a way to do what even the trusik priests of old had trouble with. You are well on your way to uncovering the secrets that Txevu has holed up inside its walls. Congratulations!
"a pile of bones" spawns nearby with "Sliver of the High Temple" (Gates of Discord progression item). Note that hostile adds do NOT despawn upon the Keeper's death.
Loot
The Altar Overseer and Oracle of the Altar each drop 1 item:
Aegis of Blackscales
Bloodlink Chestmail
Darkglint Blade
Mantle of Mending
Overseer's Geostone
Ring of the Brutish Beasts
Stone Drum of Cohesion
The Keeper of the Altar drops 4 items from its loot table:
Bauble of the Forlorn
Blazing Stone of Demise
Bloodied Ritual Trinket
Bloodstone of Force
Darkened Coldstone
Gem-Inlaid Ritual Cloak
Glyph-Lined Vrex Cloak
Incantor Mask of Death
Robe of Destruction
Sharp Irestone Fragment
Stone-Worked Pauldrons
Veil of Entrancement Reward: Ring of the Brutish Beasts
Reward: Aegis of Blackscales
Reward: Bloodlink Chestmail
Reward: Darkglint Blade
Reward: Dark Belt of Wrath
Reward: Mantle of Mending
Reward: Incantor Mask of Death
Reward: Blazing Stone of Demise
Reward: Darkened Coldstone
Reward: Glyph-Lined Vrex Cloak
Reward: Stone-Worked Pauldrons
Reward: Robe of Destruction
Reward: Tome of Tainted Axe of Hatred
Reward: Veil of Entrancement
Reward: Sharp Irestone Fragment
Reward: Bloodied Ritual Trinket
Reward: Gem-Inlaid Ritual Cloak
Reward: Bloodstone of Force
Reward: Sliver of the High Temple
Quests for Kod'Taz, Broken Trial Grounds
Gates of Discord Progression #4d: Pit of the Lost (Normal): This part of Gates of Discord progression follows your completion of the Summoner Ring quest (note that some elements of Kod'Taz progression can be completed outside of the order outlined here, which is but one path you can take).Pit of the Lost
When you spoke with Kevren Nalavat about "other tasks", you saw:
Kevren Nalavat says 'As I suspected, you're ready for some challenging work! I must warn you though, what lies ahead is not for the faint of heart. The other tasks that are available deal with three other areas. Those areas are the [Martyrs Passage], the [Pit of the Lost], and the [Crumbled Sanctuary] of the Divine. Choose the one you wish to attempt and we can continue.'
You say, 'What about the Pit of the Lost?'
Kevren Nalavat says 'I'm glad you've decided to continue helping the brotherhood. We can always use adventurers like you. There have been some mysterious happenings coming from the Pit of the Lost. I don't have the information on what's going on, but another of the brotherhood nearby does. You must venture south of the Martyrs Passage and speak with Tublik Narwethar. He will know what's going on.'
Tublik
Head to the far southwestern part of the zone where you'll find Tublik Narwethar (click for map image) at about /loc -2000, 1275, -348.
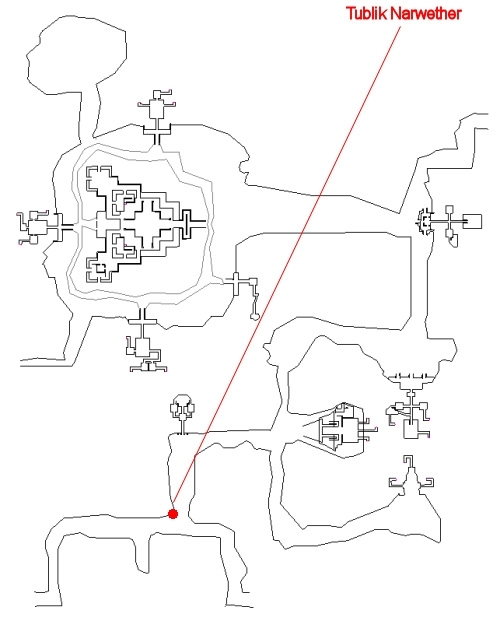
You say, 'Hail, Tublik Narwethar'
Tublik Narwethar glances at you suspiciously. 'Can I help you with something? Did Kevren send you about the Pit of the Lost? Speak up!'
You say, 'Kevren sent me'
Tublik Narwethar says 'Ah yes, so he did. I've been dealing with some others that Kevren has sent my way. What can I do for you specifically?'
You say, 'Tell me about the Pit of the Lost'
Tublik Narwethar says 'I see Kevren finally sent someone to me to look into the pit. It's about time! I've been telling him over and over that there are some really strange things going on in the Pit of the Lost to the north of here, but he just doesn't seem to want to pay enough attention to the claims. In any case, you're here now and that means that you must be [willing to look] into the odd occurrences, right?'
You say, 'I am willing to look'
Tublik Narwethar says 'I'm glad I can count on you. You need to know a couple things before you go. As I said, there are strange things going on in the pit, but we're not sure what they are yet. We have sensed an energy force emanating from that area and believe there are some kind of artifacts there that must be collected. We need you to [collect the artifacts] and return them so we can study them.'
You say, 'I'll collect the artifacts'
Tublik hands you a bag and says, 'Place four artifacts you find from the pit in this bag and seal it off. Return the sealed bag to me when you're done so I can further examine what you find. Make haste to the Pit of the Lost and be careful -- there's no telling what kind of evils are waiting for you there. If you have someone else with you that [needs a bag], have them tell me so.'
You receive "Tublik's Bag".
Relic Devotees
Head to the very far northwestern part of the zone where you'll find a large pit (the "Pit of the Lost") swarming with undead. Among the mobs that can spawn in place of standard trash mobs are "Forlorn Relic Devotees" - these mobs are tougher than the general zone population. They hit for a max ~1,700 and are immune to all forms of crowd control.
Kill and loot them until you've collected four items:
Minor Relic of Energy: Nep
Minor Relic of Energy: Oxa
Minor Relic of Energy: Suv
Minor Relic of Energy: Tek
Combine these in "Tublik's Bag" to produce "Tublik's Sealed Bag", and then turn it in to Tublik.
Tublik Narwethar says 'You're done already? I wasn't expecting such a prompt response, but nicely done _____! Give me a while to examine these artifacts. I should have some additional information for you once you return.'
The Ageless Relic Protector
You say, 'Hail, Tublik Narwethar'
Tublik Narwethar says 'Welcome back, _____. I've been looking over those artifacts you returned to me in the sealed bag and I'm afraid I have some disturbing news. It seems the artifacts weren't artifacts at all, but objects of ghastly power held by the dark spirits you collected them from. What's worse is that since you've collected these objects, the energy emanating from the pit has [gotten stronger]!'
You say, 'Gotten stronger?'
Tublik Narwethar says 'The power wasn't as noticeable before. Now, though, it seems there's a fiend in the pit that's become agitated by the removal of these objects we've been collecting. I believe that whatever is behind the energy disruption kept a watchful eye over those objects. Now that they're gone, I believe it will try to find them again and destroy anything and everything in its path in the process. You must [stop it] before it has a chance!'
You say, 'I'll stop it!'
Tublik Narwethar says 'You must return to the Pit of the Lost and find whatever this fiend is and destroy it. I believe that it will have some kind of artifact that is linked to the ones you returned to me in the sealed bag. Return whatever it may have to me. Good luck, _____, I have no doubt that the artifact it holds will be as interesting of a find as anything else we've uncovered so far!'
Head back to the Pit of the Lost where you'll now find the "Ageless Relic Protector" overlooking the western edge of the pit.
The Ageless Relic Protector recognizes those who took its relics and prepares for battle.
Ageless Relic Protector charges those who stole the relics it protects!
The mob hits for a max ~2,200 and AEs "Strike of Glory". Upon its death, it splits into 2x "Ageless Relic Protector" (hit for a max ~1,500 each):
Ageless Relic Protector gets its bearings and continues its assault on the relic thieves!
Each of these two split mobs split into an additional 3x "Ageless Relic Protector" (for a total of six more) which need to be killed to complete the event. The final splits hit a bit harder than the second splits, but not much more difficult. All mobs are immune to all crowd control. No balancing is required.
Ageless Relic Protector has been slain by _____!
Each of the final six split mobs drops a "Protector's Relic of Energy" (turn-in item for this quest).
One of the mobs drops one item of loot:
Ageless Spectral Cuffs
Gaunt Veil of Purification
Haggard Trusik Shawl
Reflective Orb of Energy
Sandals of Spectral Ferocity
Return to Tublik
Hand in the "Protector's Relic of Energy" to Tublic Narwethar:
Tublik Narwethar says 'Excellent! We don't have to worry about that abomination any longer. This artifact you found on the creature is also quite unique. It will be a while before I have a chance to look it over, but it's nice to have it in our possession nonetheless. Well done once again, _____. I look forward to working with you again soon!'
This completed the "Pit of the Lost" portion of Gates of Discord progression.
You say, 'Give me a progress update'
Finished! - You can now retry any of the trials at any time!
Finished! - You have completed the trial at the Temple of Singular Might!
Finished! - You have completed the trial at the Temple of Twin Struggles!
Finished! - You have completed the trial at the Temple of the Tri-Fates!
Finished! - You've been commissioned to investigate the Martyrs Passage!
Finished! - You've returned four relics from the Martyrs Passage!
Finished! - You've returned valuable information as to why the Muramites are in the Martyrs Passage!
Finished! - You've been commissioned to investigate the Temple of the Damned!
Finished! - You've recovered important glyphs from the Temple of the Damned!
Finished! - You've successfully translated the glyphs you found in the Temple of the Damned!
Finished! - You've collected the Minor Relics of Power from the Pit of the Lost!
Finished! - You've rescued the artifact from the Ageless Relic Protector in the Pit of the Lost!
Kod'Taz still has secrets left to uncover...
Moving On
You are now done with the Pit of the Lost.
Next up is the "Crumbled Sanctuary".
Ikkinz Group Trial #1: Singular Might (Normal):
Requesting the Expedition
If this is your first time doing this Ikkinz trial, you will need to first speak with Kevren Nalavat (click for map image) in Kod'Taz, the Broken Trial Grounds, as part of Gates of Discord Progression.
If you follow his dialogue and say "Singular Might", he directs you to see Gazak Klelkek (click for map image), who gives out this expedition.
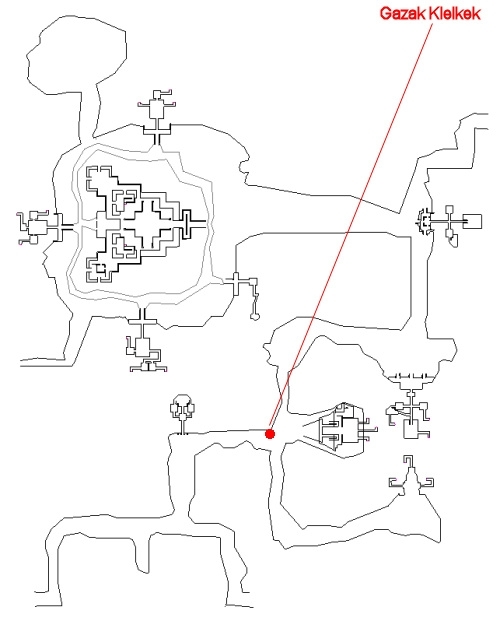
If you've already done progression, you can bypass Kevren Nalavat and speak directly to Gazak Klelkek.
You say, 'Hail, Gazak Klelkek'
Gazak Klelkek says 'Keep your voice down! We must not attract any [undo attention] to ourselves here. I may be the liaison for the Temple of Singular Might, but that doesn't make me any less of a target. I have kept watch of this temple since we began collecting information on the trusik and the Legion of Mata Muram. You should ask Kevren for more information on them if you haven't already.'
You say, 'What undo attention?'
Gazak Klelkek says 'Certainly you do not believe that we are alone here, do you? The Muramites have assigned one of their magic users to gather spiritual artifacts from this area and use their power to gain strength. This creature, which we have dubbed the [Diabolic Destroyer], controls the temple and its inner abominations.'
You say, 'What is the Diabolic destroyer?'
Gazak Klelkek says 'It is one of a fearsome collective that commands minions to do its bidding. The beast's minions recover the artifacts from within the temple. The master then extracts the energy from the artifact to become more powerful. You and your party must venture inside the temple and [eradicate the beast] before it can recover any more artifacts. The Muramites will reinforce their position shortly after it has been defeated, but we cannot allow any single creature of this sort to become too powerful.'
You say, 'I will eradicate the beast!'
Gazak Klelkek says 'Your task is to battle through the temple and enter an entrance to the inner chambers of the Temple of Singular Might. Once inside you must find the Diabolic Destroyer and kill it before it becomes more powerful. You must recover an artifact from the beast and return it to me. Once you have done this, you will be allowed to move onto the next trial. When you are [ready to proceed] and have a group with you, return to me and I shall set you on your way.'
You say, 'I am ready to proceed'
Gazak Klelkek says 'Very well then, _____. Good luck on your journey through the temple and may you prove to the brotherhood that you are more than meets the eye. The temple awaits...'
The direction to the entry to your instanced zone(s) have been marked on your compass.
Ikkinz, Chambers of Singular Might is now available to you.
The instance entrance is in the temple due east of Gazak Klelkek.
Lockout Timers
As soon as you request the expedition, you receive a 1-hour lockout timer. If you kill a loot-dropping named in the instance, you receive an 8-hour lockout timer. If you kill the Diabolic Destroyer, you receive a 17-hour lockout timer. (All timers are from the point of request.)
Named Mobs
Named mobs that are confirmed to spawn in this instance:
Pixtt Annihilator (loot dropper)
Pixtt Decimator (isn't known to drop any stat loot)
Pixtt Slaughterer (isn't known to drop any stat loot)
Pixtt Venomblade (loot dropper)
Named mobs have a chance to be up as soon as you zone in.
Expedition
General mob population here tend to hit for a max ~1,450 while named (loot dropping) mobs tend to hit for a max ~2,400.
Here, you need to make your way to the first room on your right where you'll find the Diabolic Destroyer. You need a strong tank, cleric and bard/enchanter for this encounter.
NOTE: The Diabolic Destroyer will clear its hate list if the tank uses his/her defensive discipline. Upon engaging the destroyer, three adds ("Dire Illusion"; hit for a max ~1,000; stunnable/mezzable/kiteable) spawn. Every 10 seconds, two more of these adds spawn.
You'll see this emote when the adds appear:
Diabolic Destroyer says 'Foul creatures! I will not be stopped! These should take care of you for a while!'
Upon the Diabolic Destroyer's death, the expedition locks, and you see:
Diabolic Destroyer has been slain by _____!
The Diabolic Destroyer has been defeated! Though the legion may send a replacement, you have finished what you sought out to do and delayed their progress for a time! Congratulations!
At this time, an Ikaav called "Cruel Illusion" spawns and aggro's. This is a rather trivial encounter in comparison. Kill the illusion and, if you're here for progression, loot the "Ruined Pendant of Might" from its corpse (six of them are dropped at a time).
Cruel Illusion has been slain by _____!
Cruel Illusion's corpse can no longer serve its creator.
The pendant is used as part of Gates of Discord Progression.
The Diabolic Destroyer drops a loot item and sometimes a spell rune.
Repeating the Trial
You can repeat the trial at any time by speaking with Gazak Klelkek again:
You say, 'Hail, Gazak Klelkek'
Gazak Klelkek says 'Though you have already completed the first trial we can always use someone to eradicate a ferocious beast. If you are looking for something else to do, return to Kevren Nalavat to see if he has anything else in store for you. If you want to attempt this trial again and [eradicate the beast], just tell me so and I will prepare you for your trial.'
This leads into the same text as above. Reward: Glyphed Prayer Ring
Reward: Resonating Earring of Battle
Reward: Spiritstone of Life
Reward: Bracelet of the Fearsome
Reward: Dark Belt of Wrath
Reward: Incantor Mask of Death
Reward: Earring of Destructive Essence
Reward: Ruined Pendant of Might
Reward: Glyphed Sandstone
Ikkinz Group Trial #2: Twin Struggles (Normal):
Requesting the Expedition
If this is your first time doing this Ikkinz trial, you will need to first speak with Kevren Nalavat (click for map image) in Kod'Taz, the Broken Trial Grounds, as part of Gates of Discord Progression.
If you follow his dialogue and say "Twin Struggles", he directs you to see Maroley Nazuey (click for map image), who gives out this expedition (/loc -1965, -625, -430 -- far southeastern part of the zone).
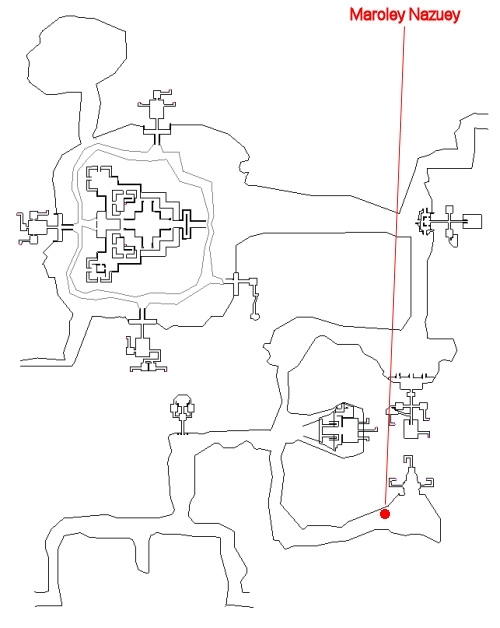
If you've already done progression, you can bypass Kevren Nalavat and speak directly Maroley Nazuey.
You say, 'Hail, Maroley Nazuey'
Maroley Nazuey says 'At last you have arrived. I have heard that you passed the trial at the Temple of Singular Might without any problems and I congratulate you on your achievement. Do not believe for a moment that you are done! Your next trial will be more difficult than the last. Are you ready to hear [what's in store] for you beyond the temple exterior?'
You say, 'What's in store?'
Maroley glances toward the temple. 'The Muramites have sent priests to this temple. These priests are not ordinary, in fact, they are terrible, horrific beings sent to collect artifacts for a singular purpose. What this purpose is we are not clear on, but we believe it has something to do with a summoning of some sort. If you're willing to [test your mettle] in this trial, now is the time for action.'
You say, 'Test my mettle?'
Maroley Nazuey says 'The rumor we have been investigating suggests that the summoning will be a beast of war that is far more destructive than anything we may have seen so far. The Muramite [priests] working inside this temple are gathering artifacts of corporeal power that will grant the beast an unusual physical strength when it is conjured. We must make sure that they do not finish this summoning.'
You say, 'What about the priests?'
Maroley Nazuey says 'I nearly forgot. You must venture inside to an entrance to the inner chambers of the Temple of Twin Struggles and enter there. Once inside you must find the Malevolent Priests. We have begun referring to them thusly because of their torturous looks and ways. They are very unpleasant and work cooperatively. You must get to them and [recover the artifacts] they have been gathering before they are allowed to move them to another temple nearby.'
You say, 'Recover the artifacts?'
Maroley Nazuey says 'This is your moment, _____. Now is the time to prove your worth to the brotherhood. I bid you good luck and hope that the strength you showed in the first trial will aid you again in your second one. When you are [ready to enter the temple] and have a group with you, return to me and I shall set you on your way.'
You say, 'I am ready to enter the temple'
Maroley Nazuey says 'Good luck then, _____. Perhaps I will see you again soon and, by that time, I hope you have the artifact in your possession.'
The direction to the entry to your instanced zone(s) have been marked on your compass.
Ikkinz, Chambers of Twin Struggles is now available to you.
The instance is entered via the temple just northeast of Maroley Nazuey's location (it's the western instance entrance inside that temple).
Lockout Timers
As soon as you request the expedition, you receive a 1-hour lockout timer. If you kill a loot-dropping named in the instance, you receive an 8-hour lockout timer. If you kill the two Malevolent Priests, you receive a 17-hour lockout timer. (All timers are from the point of request.)
Named Mobs
Named mobs that are confirmed to spawn in this instance:
Hexxt Deathaim
Pixtt Airstrangler
Pixtt Neuromancer
Pixtt Venomblade
Rav Deathfang
Rav Interceptor
Named mobs have a chance to be up as soon as you zone in.
Expedition
General mob population here tend to hit for a max ~1,450 while named (loot dropping) mobs tend to hit for a max ~2,400.
The first thing you'll see upon entering the zone is a locked door guarded by three ukuns. The middle ukun is immune to mez and stun while the others are susceptible to crowd control. Once all three are dead, the door unlocks.
From here, you need to make your way to the first room on the left. The two closed-off chambers house the Malevolent Priests, so don't enter them yet. Clear the room of mobs first, and then when ready for the final encounter, you can let the priests spot you.
Once the Malevolent Priests see you, they begin casting spells on your party:
Malevolent Priest says 'I can feel your distress as you defend against this malevolent assault!'
Malevolent Priest begins to cast a spell. <Malevolent Assault>
Malevolent Priest says 'May your soul be torn by this spiteful vexer!'
Malevolent Priest begins to cast a spell. <Malevolent Vex>
Malevolent Priest says 'Our combined powers shall destroy you!'
Malevolent Priest begins to cast a spell. <Coordinated Strike>
Malevolent Priest begins to cast a spell. <Coordinated Strike>
Coordinated Strike: Single Target, Unresistable (0)
1: Decrease Hitpoints by 1500
Malevolent Assault: Single Target, Unresistable (0)
1: Decrease HP when cast by 750
2: Decrease STA by 100
Malevolent Vex: Single Target, Unresistable (0)
1: Decrease Hitpoints by 150 per tick (20 minutes)
2: Increase Curse Counter by 90
Around the two priests are 9x "Constrained Servitor". These mobs are rooted in place and don't attack back. However they have a buff on them called Malevolent Retribution which is a damage shield you cannot dispell. So range them down to activate the priests. Note that the priests will attempt to heal them:
Malevolent Priest says 'We mustn't allow these slaves to be harmed!'
Malevolent Priest begins to cast a spell. <Discordant Light>
Constrained Servitor has been slain by _____!
The constrained servitor is allowed to rest at last. The priests he was serving have been weakened by his death.
Each Servitor death weakens the Malevolent Priests by 10% health. Once all nine are dead, the priests become attackable (both are at 12%).
The Malevolent Priests each hit for a max ~2,000. They do NOT summon and they are NOT aggro-linked, so you can kill them one at a time; however, once one is killed, you have 60 seconds to kill the other one, or else the original gets a resurrection from the remaining priest (it respawns).
Malevolent Priest has been slain by _____!
The Malevolent Priests have been defeated! Though the legion may send replacements, you have finished what you sought out to do and delayed their progress for a time! Congratulations!
Once both priests are dead, 2x "a pile of bones" spawn. The one in the south cubby contains one item of loot. The one in the north cubby contains a "Stained Stone Chalice" for each group member. (used as part of Gates of Discord Progression).
Repeating the Trial
You can repeat the trial at any time by speaking with Maroley Nazuey again:
You say, 'Hail, Maroley Nazuey'
Maroley Nazuey says 'Though you have already completed the second trial, we will allow you to continue to hone your skills in the temple. If you would like to [test your mettle] against the priests again, tell me so, and I will begin preparations for you. You must be warned once more that we have no control over the strength of the beasts that lay inside these temples.'
This leads into the same text as above. Reward: Glyphed Prayer Ring
Reward: Carved Vrex Totem
Reward: Dark Belt of Wrath
Reward: Incantor Mask of Death
Reward: Stained Stone Chalice
Reward: Bloodstone Fragment
Ikkinz Group Trial #3: Tri-Fates (Normal):
Requesting the Expedition
If this is your first time doing this Ikkinz trial, you will need to first speak with Kevren Nalavat (click for map image) in Kod'Taz, the Broken Trial Grounds, as part of Gates of Discord Progression.
If you follow his dialogue and say "Twin Struggles", he directs you to see Kenra Kalekkio (click for map image), who gives out this expedition (/loc -430, -1260, -420 -- in the southeastern corner of the zone are three temples: this is outside northernmost of those temples).
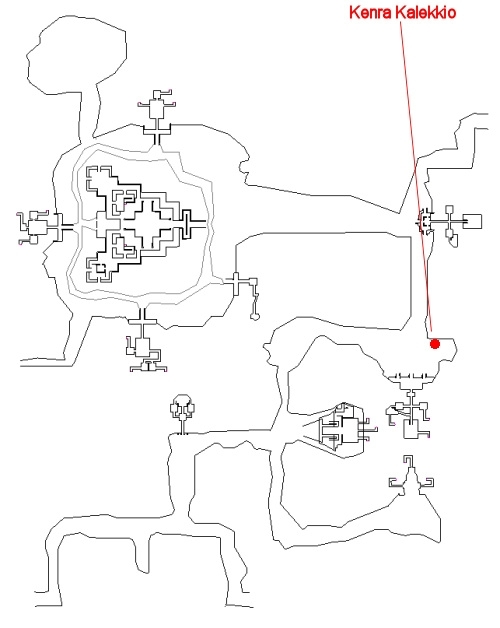
If you've already done progression, you can bypass Kevren Nalavat and speak directly Kenra Kalekkio.
You say, 'Hail, Kenra Kalekkio'
Without progression, you see:
Kenra Kalekkio says 'It would be best if you kept out of sight, _____. You never know when one of those fearsome invaders might wander past looking for a fight. You look like you're here with a purpose, but I can't quite figure out what. Why don't you go see Kevren? He should be more than happy to speak to another adventurer.'
With progression, you see:
Kenra Kalekkio says 'I have been expecting you, _____. You proven your worth thus far by completing the first two trials and for that I applaud you. You are not through with your testing though. You have a [final test] to complete here at the Temple of the Tri-Fates before you will be considered ready for further work.'
You say, 'What final test?'
Kenra Kalekkio says 'Very well. Time is critical, _____. Your final test takes you within the Temple of the Tri-Fates. We call it this because of the three creatures you will encounter once inside. The [three beasts] are hunters that have deadly accuracy with a bow and attack together to make a dangerous combination.'
You say, 'Three beasts?'
Kenra Kalekkio says 'The three hunters inside the temple are called the Tri-Fates. They are named thusly because of their ability to control your fate on a whim. Their victims' usual fate is that of death, though I believe the Wayfarers Brotherhood has recruits that can stand up to them. Perhaps you are that person? Perhaps you have the desire to [prove yourself] worthy, venture into the temple, and slay the beasts?'
You say, 'I'll prove myself'
Kenra Kalekkio says 'Good to hear, but before you go there is more you must know. These hunters are guarding some relics that are giving them extremely high accuracy with their weapons. If they are allowed to possess these relics any longer, they may become an unstoppable force. You must [recover the relics] so the Wayfarers Brotherhood can examine them.'
You say, 'I'll recover the relics'
Kenra Kalekkio says 'This is your final trial and will prove, once and for all, if you are capable of taking on the more serious issues concerning the Muramites. You must fight through the temple and enter an entrance to the inner chambers of the Temple of the Tri-Fates. Once inside, kill the Tri-Fates and return the relics. When you are [ready to begin] and have a group with you, return to me, and I shall send you on your way.'
You say, 'I am ready to begin'
Kenra Kalekkio says 'Then I bid you good luck on your journeys, _____. Make haste into the temple and, hopefully, by the time we meet again you'll have recovered the relics and passed the final test.'
The direction to the entry to your instanced zone(s) have been marked on your compass.
This instance is entered in the temple just south of Kenra.
Lockout Timers
As soon as you request the expedition, you receive a 1-hour lockout timer. If you kill a loot-dropping named in the instance, you receive an 8-hour lockout timer. If you complete the expedition, you receive a 24-hour lockout timer. (All timers are from the point of request.)
Named Mobs
Named mobs that are confirmed to spawn in this instance:
Hexxt Sightsliverer (loot dropper)
Pixtt Tyranist (unknown)
Pixtt Willbreaker (loot dropper)
Subjugated Brawler (unknown)
Named mobs have a chance to be up as soon as you zone in.
Expedition
General mob population here tend to hit for a max ~1,300 while named (loot dropping) mobs tend to hit for a max ~2,100.
Mobs in this zone can drop components to make a Kyv Bow of Precision, if you have a ranger who could use it (Fletching skill).
Here, you'll need to make your way to 3x "Flesh Hunter" (your kill targets for this expedition). Following the main Ikkinz hall way all the way down the first ramp, and into the door with three alcoves. Note that the door remains locked until you've killed the three kyvs in the hallway preceding it and the two ikaavs in front of it.
Inside the main room are 1x "Flesh Hunter" in each of the room's alcoves. The nameds are permanently rooted, summon when damaged, and hit for a max ~1,750. They appear to share aggro.
Kill the three Flesh Hunters one at a time, working from north to south. Keep in mind that due to aggro-sharing, your healers will have lots of aggro on the second and third nameds.
If you fail to kill all three Flesh Hunters within a certain time frame, they respawn.
Flesh Hunter has been slain by _____!
The Tri-Fate Hunters have been defeated! Though the legion may send replacements, you have finished what you sought out to do and delayed their progress for a time! Congratulations!
Once the third Flesh Hunter is dead, the expedition is completed and 2x "a pile of bones" spawn along the opposite wall (one contains loot; the other contains a "Thrice-Notched Arrow Remains" for each group member (used as part of Gates of Discord Progression).
Repeating the Trial
You can repeat the trial at any time by speaking with Maroley Nazuey again:
You say, 'Hail, Kenra Kalekkio'
Kenra Kalekkio says 'Though you have already completed the third trial, we will allow you to continue to sharpen your abilities in the temple. I must remind you that though these trials are for your benefit, we cannot control what goes on inside. If you still want to [prove yourself], tell me, and I will make preparations for you to enter the temple.'
This leads into the same text as above. Reward: Glyphed Prayer Ring
Reward: Crafted Wristband of Strife
Reward: Dark Belt of Wrath
Reward: Incantor Mask of Death
Reward: Platinum Hoop of Disharmony
Reward: Kitren's Tattered Cloak
Reward: Thrice-Notched Arrow Remains
Reward: Manastone Shard
Reward: Glyphed Sandstone
Reward: Kyv Bow of Precision
Ikkinz Raid #1: Chambers of Righteousness (Normal):
Before Raiding
This raid begins with Tublik Narwethar (click for map image) in Kod'Taz (southwestern part of the zone) at about /loc -2000, 1275, -348.
Pre-Requisites for requesting this raid:
- Completion of all three Ikkinz group trials (and respective item turn-ins)
- Completion of Kevren's "Martyrs Passage" quest
- Completion of Tublik's "Crumbled Sanctuary" quest
- Possibly completion of Kevren's "Temple of the Damned" quest (not confirmed)
Pre-Requisites for participating in this raid:
- If below Level 65, must have beaten the Tipt group expedition.
- If Level 65 or higher, there are no known participation requirements.
The instance zone-in is in the northwestern quadrant of the zone. It's the temple due south of the giant temple, so you can have your raid meet there ahead of time while the requester gets the expedition.
Requesting the expedition requires that you be in a raid format (/raidinvite) and have at least six players in the raid (must be online, but don't have to be in the zone; levels don't appear to matter).
If you try to request the raid without pre-requisites, you see:
Tublik Narwethar says 'What is it with you people? Can't you leave a dwarf alone to his work for five minutes without badgering him about this temple or that sanctuary? Give me a break for once and maybe we can talk about it later!'
If you try to request it with less than six people, you see:
I'm sorry, but you don't have enough comrades with you to venture into this dangerous area. Come back when you have at least six groups of friends to join you on this perilous journey.
Summary
- Say "Sanctuary of the Righteous" to trigger the expedition.
- The instanced zone is entered through the south temple in the northwestern quadrant of the zone.
- Inside, Kill 2x "Priest of Righteousness" in the first room on the left.
--- They leash. These are unslowable and infuriate at 50% and 10% (AE rampage).
- Kill the Priest of Righteousness in the room across the hall from this one. It is unslowable and infuriates at 50% and 10% (AE rampage).
- Kill the Defenders of Righteousness in the two rooms further down the hall. These are unslowable and have single-target rampage.
- Open the door to the Arena-type pit. Right behind it is the Custodian of Righteousness.
- Kill the Custodian of Righteousness (unslowable and flurries; hits very fast).
- In the middle of the pit is the Guardian of Righteousness. Once aggro'd, the Crumbling Monuments up top become active.
- Burn the Guardian down as fast as possible. It uses the effect "Throw" (knockback) and "Bury" (has feign-death component)
--- The Crumbling Monuments become inactive after the Guardian dies.
- The Crumbling Monolith at the very top now becomes targettable. Charge it and kill it. Loot the shawl it drops.
- Go past where the Crumbling Monolith stood, down the hallway, and into the crypt where you will find Spirit of Tunik Tamuik.
- Give the shawl to the spirit in order to activate the mob.
- Kill the Spirit of Tunik Tamuik, and loot an artifact off the bones which spawn.
Requesting the Expedition
You say, 'Hail, Tublik Narwethar'
Tublik Narwethar says 'I wasn't expecting you back so soon, _____, but I'm glad you're here. I've been analyzing the glyphs on the last three artifacts you recovered and, the way I read them, it seems the trusik priests used the [four temples] around the Altar of Destruction to gain access to a temple to face some kind of final rite of passage.'
You say, 'Tell me about the four temples'
Tublik Narwethar says 'As you've already uncovered, the Sanctuary of Divine Destruction was used to uncover the purpose for the other three. I believe the Muramites destroyed that temple because it holds the key to the remaining three temples and the artifacts that they hold. Now that we know what's ahead, we can continue forth and unravel this [mystery].'
You say, 'How do we unravel the mystery?'
Tublik Narwethar says 'It's clear to me that you must proceed into each of the three remaining temples and recover the three artifacts that are in them. It's up to you how you want to proceed, but you will have to enter the [Sanctuary of the Righteous], the [Sanctuary of the Glorified], or the [Sanctuary of the Transcendent]. Each one of these holds an artifact that I believe will be used to gain entrance to whatever lies beyond the Altar of Destruction. Which will you choose?'
You say, 'We'll enter the Sanctuary of the Righteous'
Tublik Narwethar says 'The glyphs you recovered show an Artifact of Righteousness that is guarded by a sentinel that is ages old. You will find the Sanctuary of the Righteous to the south of the Altar of Destruction. You must gather a raiding party several times larger than your normal party's size and be prepared for anything. Find an entrance to the inner chambers of the Sanctuary of the Righteous and recover the artifact. May you be gifted with the luck of the brotherhood. I fear you may need it.'
The direction to the entry to your instanced zone(s) have been marked on your compass.
Ikkinz, Chambers of Righteousness is now available to you.
Lockout Timers
Unlike the group expeditions, this raid has no lockout timer upon request. Here, you receive a 12-hour lockout timer upon the death of whichever "Priest of Righteousness" drops stat loot. You receive an additional 12 hours of lockout time upon the death of the "Custodian of Righteousness", an additional 24 hours upon the death of "Guardian of Righteousness", another 12 hours upon the death of "Crumbling Monolith", and another 36 hours upon the death of the "Spirit of Tunik Tamuik" (for a total of four days if you complete the entire expedition).
Named Mobs
Group-quality named mobs that are confirmed to spawn in this instance:
(none confirmed)
Named mobs have a chance to be up as soon as you zone in.
General Mob Population
Base mobs in this zone tend to hit for a max ~1,850 to 2,000. Most are mezzable and stunnable. The three hallway roamers appear to respawn, but no other mobs are known to do so.
Priest of Righteousness
These mobs are tethered to their rooms. One appears where the Diabolic Destroyer does in its expedition; the other two appear where the priests do in the Twin Struggles expedition. They each hit for a max ~2,400 and "infuriate" at 50% and 10% (AE rampage for several rounds).
Priest of Righteousness has been slain by _____!
The Priest of Righteousness topples over to one knee before falling to the ground. He has failed his duties to the Guardian of Righteousness.
You'll get one item of loot out of these three mobs' deaths.
Defenders of Righteousness
Kill 2x "Defender of Righteousness" (one at the end of each hallway extending out of the main hall). These hit for a max ~2,600 and single-target rampage. They don't drop any loot.
Defender of Righteousness has been slain by _____!
The Defender of Righteousness can no longer fulfill its duty to the sanctuary. You are closing ever-nearer to your final destination.
This locks the door to the arena area at the south end of the main hall. Behind it is the "Custodian of Righteousness".
Custodian of Righteousness
The Custodian, unlike other nameds here, is not leashed or rooted. It hits for a max ~1,500; flurries; hits very fast; infuriates at 10% (AE rampage); and has a mem blur effect. It drops one item of loot.
Custodian of Righteousness shifts its weight and turns its attention to someone new. (seen as it mem blurs)
Custodian of Righteousness has been slain by _____!
The Custodian of Righteousness has fallen! Its death has alerted the Guardian of Righteousness to your presence!
Guardian of Righteousness
The Guardian of Righteousness hits for a max ~3,600; is perma-rooted; summons when damaged; has ~500,000 hitpoints; summons adds ("Crumbling Monument") about one every 20 seconds; and casts "Throw"; "Bury"; and "Stone Vortex".
Bury: Single Target, Unresistable (0)
1: Decrease Hitpoints by 6000
2: Feign Death, 87% Success Rate
Stone Vortex: Single Target, Magic (-50)
1: Decrease Hitpoints by 1050
2: Stun (4.00 sec)
Throw: Single Target, Magic (-1000)
1: Decrease Hitpoints by 3000
Guardian of Righteousness motions toward three attackers and throws them wildly around! (casts "Throw" on three targets)
Guardian of Righteousness motions for one of the crumbling monuments to come forth and aid in the attack! (summons add; these hit for a max 1,800 and go non-aggro soon after becoming active)
Guardian of Righteousness slams his fist down, burying the opponent. (casts "Bury")
Guardian of Righteousness has been slain by _____!
As the guardian comes crashing down, a new threat presents itself to you. A crumbling monolith prepares itself to stop you from progressing any further!
It drops one item of loot.
The Crumbling Monolith
The Crumbling Monolith hits for a max ~2,500; is perma-rooted; summons when damaged; and had ~200,000 hitpoints. It drops one rune + "Decaying Spirit Shawl" (turn-in item to activate the final named).
Crumbling Monolith has been slain by _____!
The death of the crumbling monument has caused the stone in this room to stir slightly. You hear the clunking and grinding of stone against stone as something is seemingly unlocked.
Spirit of Tunik Tamuik
Click on the pillar behind the Crumbling Monolith to reveal the path to the crypt. The area is safe, so you can move in.
You have found the hidden entrance to the crypt! The statue moves to the side to allow entrance to the dank hall beyond.
You say, 'Hail, Spirit of Tunik Tamuik'
Spirit of Tunik Tamuik can't see you nor does he know your name. He blinks as he regards you as a trusik. 'You have made it through the trials of this sanctuary. The Guardian of Righteousness was my creation and will be forevermore. It is a ward against those who are not worthy and a test to those trusik priests who believe they can become the highest among priests -- the Vrex. You are most talented to have made it this far. Now, though, it is time for me to rest. I left something with my creations that you should have with you, correct? Hand it to me now.'
When ready for a fight, hand it the "Decaying Spirit Shawl":
Spirit of Tunik Tamuik says 'Just as I expected you to do! Now I can finally rest and you will not be able to stop me!'
Spirit of Tunik Tamuik shimmers momentarily as though he were somehow changing.
It hits for a max ~3,600; is perma-rooted; summons when damaged; and has ~620,000 hitpoints. It drops two items of loot.
Spirit of Tunik Tamuik has been slain by _____!
The Spirit of Tunik Tamuik has been defeated! You have sent his remaining spectral essence to rest. A feeling lingers that he may once again return to defend this sanctuary from evil doers and to continue to test the priests of the trusik people.
"a pile of bones" spawns nearby. It contains 4x "Artifact of Righteousness" (Gates of Discord progression item).
Loot
Possible loot from the Priests and Custodian:
Aegis of Blackscales
Bloodlink Chestmail
Darkglint Blade
Mantle of Mending
Possible loot from the Guardian of Righteousness & Spirit of Tunik Tamuik:
Blackstone of Radical Thought
Cranial Bludgeoner
Fleshthreader's Mace
Onyx Ring of Prayer
Runed Flesh-Banded Leggings
Shining Bloodstone
Taelosian Geomancy Stone Jelki Reward: Aegis of Blackscales
Reward: Bloodlink Chestmail
Reward: Darkglint Blade
Reward: Onyx Ring of Prayer
Reward: Dark Belt of Wrath
Reward: Mantle of Mending
Reward: Incantor Mask of Death
Reward: Fleshthreader's Mace
Reward: Cranial Bludgeoner
Reward: Blackstone of Radical Thought
Reward: Shining Bloodstone
Reward: Runed Flesh-Banded Leggings
Reward: Artifact of Righteousness
Ikkinz Raid #2: Chambers of Glorification (Normal):
Before Raiding
This raid begins with Tublik Narwethar (click for map image) in Kod'Taz (southwestern part of the zone) at about /loc -2000, 1275, -348.
Pre-Requisites for requesting this raid:
- Completion of all three Ikkinz group trials (and respective item turn-ins)
- Completion of Kevren's "Martyrs Passage" quest
- Completion of Tublik's "Crumbled Sanctuary" quest
- Possibly completion of Kevren's "Temple of the Damned" quest (not confirmed)
Pre-Requisites for participating in this raid:
- If below Level 65, must have beaten the Tipt group expedition.
- If Level 65 or higher, there are no known participation requirements.
NOTE regarding past possible crafting requirements: There are NO tradeskill requirements in this raid. ANYONE of any class of any skill level can do the combines in the Glorification raid.
The instance zone-in is the westernmost temple in the zone (due west of the giant temple in the zone's northwestern quadrant), so you can have your raid meet there ahead of time while the requester gets the expedition.
Requesting the expedition requires that you be in a raid format (/raidinvite) and have at least six players in the raid (must be online, but don't have to be in the zone; levels don't appear to matter).
If you try to request the raid without pre-requisites, you see:
Tublik Narwethar says 'What is it with you people? Can't you leave a dwarf alone to his work for five minutes without badgering him about this temple or that sanctuary? Give me a break for once and maybe we can talk about it later!'
If you try to request it with less than six people, you see:
I'm sorry, but you don't have enough comrades with you to venture into this dangerous area. Come back when you have at least six groups of friends to join you on this perilous journey.
Summary
Warning to high level players: The final encounter in this expedition involves mobs that split at health-based points. If you kill the mob before it has a chance to realize it's passed its health check, you won't be able to complete the raid.
- The same person needs to loot the glyphs from this raid (no known skill requirements needed).
- Kill the Pixtt Assault Ward beyond the first door (hard hitter).
- Kill 2x "Visionary of Glory" in the first room on the left (leashed to the room; unslowable; AE rampage at 50% and 10%).
- Kill 1x "Visionary of Glory" in the room across the hall (same room where Diabolic Destroyer spawns).
--- Each of the Visionaries drops a rune (for research use).
- Move down the hallway, past the other doors and arena, and down the ramp to another large doorway.
- In this room, kill the Pixtt Condemner (casts an unresistable AE silence).
--- Have the same person loot the container it drops.
- At the door in the opposite end of the room is "Sentinel of Glorification" (AE fling effect + feign death effect).--- Have your looter get the Rune from its corpse.
- The researcher who looted the items needs to do some combines:
--- Inside the "Faded-Glyph Tablet", combine "Runed Glyph: Niliktek" + "Runed Glyph: Fexika" + "Runed Glyph: Aktek" to produce "Axtekilitek"
------ "Axtekilitek" is the key to open the door at the bottom of the ramp.
--- Inside the "Faded-Glyph Tablet", combine "Axtekilitek" + "Runed Glyph: Kruxek" to produce "Kruxilitek".
- Use the "Kruxilitek" to open the door behind the Sentinel (keep the item for later)
- Move past the Sentinel's spawn point, and down the hallway to the right (you can slip by many of the mobs in the feasting den).
- Make sure all trash mobs in the area of the Glorification room are killed, including roamers. They make for a rude interruption to the rest of the raid.
- Have your looter turn in the "Kruxilitek" to the Guardian of Glorification to trigger its actvity (Guardian procs "Throw").
- Once the Guardian hits 50%, it will split into two guardians.
--- WARNING: If you're a high level doing this raid, make sure you let the Guardian split (if you kill it, you'll have to repeat the raid).
--- If you need a break at this point, you can move your raid out of the room and have them leash, to allow you some recovery time.
- Upon the first split, the six hornblowers standing on top of the horns behind the Guardian become attackable (these don't fight back, even at melee range).
- Each of the split Guardians, when at 50% health, splits into two more Guardians.
- Upon the death of all Guardians, a pile of bones spawns with the artifacts (looted as part of progression).
Requesting the Expedition
You say, 'Hail, Tublik Narwethar'
Tublik Narwethar says 'Welcome back, _____. You've recovered one of the three artifacts from the three remaining sanctuaries. You still have to visit the [Sanctuary of the Glorified] and the [Sanctuary of the Transcendent] and recover the two artifacts still remaining there. Which would you like to proceed with?'
You say, 'We'll enter the Sanctuary of the Glorified'
Tublik Narwethar says 'The glyphs you recovered show an Artifact of Glorification that is guarded by a sentinel that is ages old. You will find the Sanctuary of the Glorified to the west of the Altar of Destruction. You must gather a raiding party several times larger than your normal party's size and be prepared for anything. Enter an entrance to the inner chambers of the Sanctuary of the Glorified and may luck be your path.'
The direction to the entry to your instanced zone(s) have been marked on your compass.
Ikkinz, Chambers of Glorification is now available to you.
Lockout Timers
Unlike the group expeditions, this raid has no lockout timer upon request. Here, you receive a 12-hour lockout timer upon the death of whichever "Visionary of Glory" drops stat loot. You receive an additional 12 hours of lockout time upon the death of the "Sentinel of Glorification", and another 3 days upon the death of the "Guardian of Glorification" encounter (for a total of four days if you complete the entire expedition).
Named Mobs
Group-quality named mobs that are confirmed to spawn in this instance:
Coerced Tiv Chanter
Subjugated Vrex Caller
Subservient Punisher
Named mobs have a chance to be up as soon as you zone in.
General Mob Population
Base mobs in this zone tend to hit for a max ~1,850 to 2,000. Most are mezzable and stunnable.
Pixtt Assault Ward
The Pixtt Assault Ward is right inside the first door. She hits for a max ~3,000; frequently single-target rampages; summons when damaged; is NOT tethered; summons two standard ukun pets; and procs "Grasp of Muram" and "Trample". She has about 150,000 hitpoints.
Pixtt Assault Ward has been slain by _____!
Pixtt Assault Ward's corpse has failed on its mission to halt your progress.
Visionaries of Glory
These hit for a max ~2,550 and each have ~150,000 hitpoints. At 50% and 10% health, they "infuriate" (AE rampage for several rounds before calming down). They also proc "Strike of Glory":
Strike of Glory: Single Target, Unresistable (0)
1: Decrease Hitpoints by 30
2: Feign Death, 87% Success Rate
Visionary of Glory has been slain by _____!
Visionary of Glory's corpse chokes on blood as it collapses to the ground.
Each Visionary of Glory drops a Runed Glyph. The same person should loot each.
Pixtt Condemner
The Pixtt Condemner hits for a max ~2,900 and has ~240,000 hitpoints. It is a cleric, and will heal itself. It is NOT tethered (can be pulled). It casts a targeted 80' range AE called "Silence of the Shadows":
Silence of the Shadows: Targeted AE 80', Unresistable (0)
1: Silence
Pixtt Condemner has been slain by _____!
Pixtt Condemner's corpse risked its life to defeat you and failed.
This mob drops a container. Whoever looted the Runed Glyphs should loot it, and then combine the three Runed Glyphs in the container to produce a key called "Axtekilitek". Hold the "Axtekilitek" on your cursor, stand in front of the door where the Pixtt Condemner was, and click "u" to unlock it.
The glyphs on Axtekilitek and the door glow momentarily before the doors slide open.
Sentinel of Glorification
The Sentinel of Glorification is found at the door on the opposite end of the next room. Clear the room of mobs, and then engage the Sentinel. It hits for a max ~3,000; has ~350,000 hitpoints; flurries; and procs "Fling" (knockback) and "Bury" (feign death).
Bury: Single Target, Unresistable (0)
1: Decrease Hitpoints by 6000
2: Feign Death, 87% Success Rate
Fling: AE PC v1 200', Unresistable (0)
1: Decrease Hitpoints by 1
Sentinel of Glorification has been slain by _____!
Sentinel of Glorification's corpse crumbles into rock heaps upon the ground.
This mob drops a Runed Glyph. Inside the same container, combine this Runed Glyph with the Axtekilitek to produce a key called "Kruxilitek". Use the same process to open up the locked door.
Kruxilitek seemingly melds to the door before falling back into your hand. The door opens with ease.
Guardian of Glorification
In the Guardian's room, none of the event mobs are active, so you can clear the base population with no problem. After trash mobs are clear, pay a visit to the Guardian.
You say, 'Hail, Guardian of Glorification'
Guardian of Glorification ignores your hail. It is as if it lacks the life-force needed to move. Perhaps you have something with you that might awaken it.
Whoever has the "Kruxilitek" should now hand it to the Guardian (be ready for a fight).
Guardian of Glorification comes alive with the power of Kruxilitek!
Warning to high level players: This encounter involves mobs that split at health-based points. If you kill the mob before it has a chance to realize it's passed its health check, you won't be able to complete the raid.
The Guardian hits for a max ~3,700 and will require ~320,000 hitpoints of damage to bring it to 50%. It single-target rampages; is perma-rooted; summons when damaged; and casts "Throw" (three targets at a time) and "Manabolt".
Guardian of Glorification tosses its foes away wildly! ("Throw")
Throw: Single Target, Magic (-1000)
1: Decrease Hitpoints by 3000
Guardian of Glorification lets loose a bolt of energy toward his enemy! (Manabolt)
Manabolt: Single Target, Unresistable (0)
1: Decrease Mana by 1500
In addition, the enthralled listeners in the room will proc "Fling" on people (knockback).
Fling: AE PC v1 200', Unresistable (0)
1: Decrease Hitpoints by 1
When it reaches 50% health, it splits into two mobs:
Guardian of Glorification splits into two smaller stone workers!
The new 2x "Guardian of Glorification" each hit for a max ~3,000 and are NOT perma-rooted, but are leashed to the room (you can leash them and take a rest period at this time, if you need). The split mobs have the same spell attacks as the original.
Also at this time, the 6x "Glorified Bolsterer" above the horns go live. If left alone, they boost the Guardians' power and health:
The sounds of power emanate from the right set of horns.
The sounds of life emanate from the center set of horns.
They can be attacked. These each have ~75,000 hitpoints and can be range DPS'd (they don't summon). As the split versions of the Guardians don't see invisibility, you can actually invis and levitate your way to the Glorified Bolsterers to melee them to death (they don't fight back) without aggro'ing the Guardians.
The 2x "Guardian of Glorification" will each split once again at 50% health (for a total of four more Guardians -- it will take ~85,000 hitpoints of damage to bring one to 50% health). The 4-split Guardians each hit for a max ~2,000; have ~85,000 hitpoints each; and have the same spell attacks as the original.
Guardian of Glorification has been slain by _____!
The Guardian of Glorification has been defeated! This massive stone golem is a testament to the ancient trusik geomancy powers and you have been powerful enough to defeat it. Congratulations on completing a difficult deed.
"a pile of bones" spawns next to the horns. It contains 4x "Artifact of Glorification" (Gates of Discord progression item).
Loot
The Visionary of Glory and Sentinel of Glorification each drop one item of loot:
Aegis of Blackscales
Bloodlink Chestmail
Darkglint Blade
Mantle of Mending
Each of the 4-split "Guardian of Glorification" mobs drops one item:
Deathcaller's Stonewind
Deathwrap of Rites
Jagged Onyx Staff
Jointed Scale Greaves
Rageshale of Bolstering
Shale Shoulderpads Reward: Aegis of Blackscales
Reward: Bloodlink Chestmail
Reward: Darkglint Blade
Reward: Deathwrap of Rites
Reward: Rageshale of Bolstering
Reward: Shale Shoulderpads
Reward: Jointed Scale Greaves
Reward: Dark Belt of Wrath
Reward: Jagged Onyx Staff
Reward: Deathcaller's Stonewind
Reward: Mantle of Mending
Reward: Incantor Mask of Death
Reward: Artifact of Glorification
Ikkinz Raid #3: Chambers of Transcendence (Normal):
Before Raiding
This raid begins with Tublik Narwethar (click for map image) in Kod'Taz (southwestern part of the zone) at about /loc -2000, 1275, -348.
Pre-Requisites for requesting this raid:
- Completion of all three Ikkinz group trials (and respective item turn-ins)
- Completion of Kevren's "Martyrs Passage" quest
- Completion of Tublik's "Crumbled Sanctuary" quest
- Possibly completion of Kevren's "Temple of the Damned" quest (not confirmed)
Pre-Requisites for participating in this raid:
- If below Level 65, must have beaten the Tipt group expedition.
- If Level 65 or higher, there are no known participation requirements.
Requesting the expedition requires that you be in a raid format (/raidinvite) and have at least six players in the raid (must be online, but don't have to be in the zone; levels don't appear to matter).
If you try to request the raid without pre-requisites, you see:
Tublik Narwethar says 'What is it with you people? Can't you leave a dwarf alone to his work for five minutes without badgering him about this temple or that sanctuary? Give me a break for once and maybe we can talk about it later!'
If you try to request it with less than six people, you see:
I'm sorry, but you don't have enough comrades with you to venture into this dangerous area. Come back when you have at least six groups of friends to join you on this perilous journey.
Summary
- Here, you'll encounter "Guardian of Transcendence" in four seperate encounters:
--- At the zone-in.
--- At the base of the ramp from the main hallway.
--- Outside the door that leads to the dining area.
--- In a locked area further down that same hall.
- You will only be able to handle the first three encounters. To engage the fourth, you'll need a key.
- Kill 5x "Transcendent Acolyte" scattered around the zone.
--- Found at the Diabolic Destroyer's spawn point; the Twin Struggles room; and the Tri-Fates Hunter spawn points.
--- Have one person loot the rock essences from them (four rocks and one container).
--- NOTE: This key is reported as buggy (not always working). To be sure it will work, have the looter be the same person who requested the expedition (who should be all up to date on their progression).
--- Combine the four Rock Essences inside the container to produce a "Solid Glyphed Essence".
--- With the Solid Glyphed Essence on your cursor, go right up against the locked door and click "U" to open it.
- Kill the fourth "Guardian of Transcendence" to spawn 4x "Vrex Xalkax`s Sentinel" (appear at kill point and immediately aggro).
- The Sentinels are line-of-sight aggro, so pull carefully.
- Golems must be killed by a specific class, according to an emote they give:
--- Brute force and brawn - Warrior
--- Cringe at the appearance of talismans - Shaman
--- Deep gashes of feral savagery - Beastlord
--- Doom of death - Necromancer
--- Dread of celestial spirit - Cleric
--- Dreads the strike of dead - Shadowknight
--- Focused tranquility - Monk
--- Foreboding melody - Bard
--- Holy blade - Paladin
--- Ignores anything behind it - Rogue
--- Mind and body vulnerable - Enchanter
--- Falters when struck with the power of the elements - Wizard
--- Shies from heavy blades - Berserker
--- Summoned elements - Magician
--- The creature seems weak in the face of the power of nature - Druid
--- True shots and fast blades - Ranger
- Upon the death of the final folem, "Vrex Xalkax`s Marauder" spawns.
--- Has an AE DD for 3,000; must be killed by a specific type of class, based on an emote it gives (this emote changes every ~45 seconds):
------ Cannot stand the power of healers - Priests
------ Combined strength and ingenuity - Hybrids
------ Strength of intelligent magic - Casters
------ Strength and cunning - Melees
- Now head to the boss of the trial, "Vrex Xalkak Nixki".
--- Prior to aggro, he fluctuates between 5% and 100% health.
------ You can engage him at any point; obviously, however, it's better the lower in health he is.--- He procs Rain of Stone (AE DD for 1,500) and Grip of Stone (500 hp+mana/tick DoT)
- After he is dead, loot the artifact from the pile of bones that spawns.
Requesting the Expedition
You say, 'Hail, Tublik Narwethar'
Tublik Narwethar says 'Welcome back, _____. You've recovered two of the three artifacts from the three remaining sanctuaries. You still have to visit the [Sanctuary of the Transcendent] and recover the artifact still remaining there. Are you ready to proceed with the remaining sanctuary?'
You say, 'We'll enter the Sanctuary of the Transcendent'
Tublik Narwethar says 'The glyphs you recovered show of an Artifact of Transcendence that is guarded by a sentinel that is ages old. You will find the Sanctuary of the Transcendent to the north of the Altar of Destruction. You must gather a raiding party several times your normal party's size and you should be prepared for anything. Enter an entrance to the inner chambers of the Sanctuary of the Transcendent and may luck be a companion through the toils ahead.'
The direction to the entry to your instanced zone(s) have been marked on your compass.
Ikkinz, Chambers of Transcendence is now available to you.
Lockout Timers
Unlike the group expeditions, this raid has no lockout timer upon request. Here, you receive a 12-hour lockout timer upon the death of the first loot-dropping "Transcendent Acolyte" and an additional 12 hours for a second loot-dropping "Transcendent Acolyte". You receive an additional 24 hours of lockout time upon the death of the "Guardian of Transcendence", and another 48 hours upon the death of "Vrex Xalkak Nixki" (for a total of four days if you complete the entire expedition).
Named Mobs
Group-quality named mobs that are confirmed to spawn in this instance:
Pixtt Airstrangler
Pixtt Willbreaker (loot dropper - appears as a roamer)
Named mobs have a chance to be up as soon as you zone in.
General Mob Population
Base mobs in this zone tend to hit for a max ~1,850 to 2,000. Most are mezzable and stunnable.
Guardian of the Transcendence #1
The first time you encounter the Guardian is at the zone-in. This mob is permanently rooted; summons when damaged; hits for a max ~2,600; flurries; procs "Throw" (knockback + dmg); and has ~312,000 hitpoints. As it reaches 90% health, it goes inactive (will take about 30,000 dmg to bring it to 90% health) and the door behind it unlocks:
Guardian of Transcendence crumbles to dust upon the ground, but you have the feeling that you haven't seen the last of it yet.
Guardian of the Transcendence #2
At the end of the main hallway, down the ramp, you'll find the Guardian again. It has the same abilities as before. This time, take it to 75% health:
Guardian of Transcendence crumbled once again into a pile of dust. Like before, you feel like you haven't seen the last of it.
Guardian of the Transcendence #3
Behind the door and on the opposite end of this room is the Guardian again. This time, take it to 50% health:
Guardian of Transcendence crumbles once more to dust at your feet. Its presence remains, though. It is no doubt waiting for you.
Transcendent Acolytes
There are 5x "Transcendent Acolyte" you need to kill. They each hit for a max ~2,800 and "infuriate" at 50% and 10% health (AE rampage for several rounds before settling down).
Transcendent Acolyte has been slain by _____!
The acolyte was only a diversion, but important nonetheless. You must forge ahead to uncover the mysterious glimpses you've seen of the Guardian of Transcendence.
Each of these mobs drop a "Rock Essence" (five different items of the same name, one of which is a container). Have the same person loot all items, and then combine them to produce a "Solid Glyphed Essence".
Move up to the locked area containing the last Guardian encounter, hold the Solid Glyphed Essence on your cursor, and click "U":
The solid glyphed essence forms to an opening in the door and energy creeps out through the door like a swarm of spiders. The energy recedes in an instant and the door slides open.
Guardian of Transcendence #4
Behind the locked door is a room full of golems, one of which is the Guardian of Transcendence at 50% health. Note that because the Guardian is rooted and at 50%, be prepared to get summoned by it as soon as you generate any aggro in the room.
Clear the room of mobs, and then engage the Guardian, DPSing it dead this time. As soon as it dies, five mobs spawn at its death location: 1x "Vrex Xalkak Nixki" (non-aggro) and 4x "Vrex Xalkak`s Sentinel" (aggro).
Guardian of Transcendence has been slain by _____!
The death of the Guardian of Transcendence reveals a trusik geomancer! It appears he was the guardian all along and used his phenomenal abilities to lure you into his den!
Vrex Xalkak Nixki says 'I won't be defeated so easily! Come forth, my sentinels! Your time to work is at hand!'
Vrex Xalkak`s Sentinels
Each Sentinel has apparent line-of-sight aggro. They each hit for a max ~2,100; single-target rampage; and proc "Grip of Stone".
Grip of Stone: PB AE 125', Chromatic (-300)
1: Decrease Hitpoints by 500 per tick
2: Decrease Mana by 500 per tick
These Sentinels must be killed by a specific class, according to an emote they give at very low health:
Brute force and brawn - Warrior
Cringe at the appearance of talismans - Shaman
Deep gashes of feral savagery - Beastlord
Doom of death - Necromancer
Dread of celestial spirit - Cleric
Dreads the strike of dead - Shadowknight
Focused tranquility - Monk
Foreboding melody - Bard
Holy blade - Paladin
Ignores anything behind it - Rogue
Falters when struck with the power of the elements - Wizard
Shies from heavy blades - Berserker
Summoned elements - Magician
The creature seems weak in the face of the power of nature. - Druid
The creature's mind and body are vulnerable. - Enchanter
The creature's skin seems vulnerable to a true shot and fast blades. - Ranger
NOTE: As you're fighting the sentinels, Vrex Xalkak Nixki (non-aggro) will be casting "Mana Drain" and "Throw" on random targets.
Mana Drain: Single Target, Magic (0)
1: Decrease Mana by 15 (L1) to 510 (L100)
Throw: Single Target, Magic (-1000)
1: Decrease Hitpoints by 3000
Failure on the appropriate class kill results in an immediate respawn at full health:
Your skills were insufficient to defeat the sentinel!
It is reforming to come at you again!
NOTE: The golems seem to retain the same emote, so you can take note of what class is required and have only that class DPS it. The golems appear to only select classes based on who is in the zone, so if you don't have any of one class, you don't have to worry about it being bugged.
With the appropriate class kill, you see this:
The sentinel's rubble drops to the ground. It has been defeated.
Vrex Xalkak`s Sentinel has been slain by _____!
Upon the death of the last Sentinel, "Vrex Xalkek`s Marauder" immediately spawns upon its corpse and goes aggro.
Vrex Xalkak`s Marauder
"Vrex Xalkak`s Marauder" hits for a max ~2,800; single-target rampages; and casts "Cataclysm of Stone".
Cataclysm of Stone: PB AE 150', Chromatic (-350)
1: Decrease Hitpoints by 3000
The Marauder must be killed by a certain class type, otherwise it instantly respawns at full health:
Cannot stand the power of healers - Priests
Combined strength and ingenuity - Hybrids
Strength and cunning - Melees
The creature will perish under the strength of intelligent magic. - Casters
Vrex Xalkak`s Marauder has been slain by _____!
The marauder's remains crash to the ground. It is no more.
Vrex Xalkak Nixki
Vrex Xalkak Nixki fluctuates between 100% and 5%. Engage him at 5% if you can, to make for a quick fight. He hits for a max ~3,000 and procs "Rain of Stone" and "Grip of Stone". He has about 2.6 million hitpoints (~130,000 hp to be killed if you get him at 5% health).
Grip of Stone: PB AE 125', Chromatic (-300)
1: Decrease Hitpoints by 500 per tick
2: Decrease Mana by 500 per tick
Rain of Stone: Targeted AE 125', Chromatic (-300)
1: Decrease Hitpoints by 1500
Vrex Xalkak Nixki has been slain by _____!
Vrex Xalkak Nixki has been defeated! The whole time you were led to believe that this guardian was just another stone sentinel left as a test by the trusik priests of the past. Congratulations on a most difficult task indeed!
"a pile of bones" spawns under the table in the room. In it are 4x "Artifact of Transcendence" (Gates of Discord progression item).
Loot
Two of the "Transcendent Acolyte" mobs will drop one item each:
Aegis of Blackscales
Bloodlink Chestmail
Darkglint Blade
Mantle of Mending
The "Guardian of Transcendence" and "Vrex Xalkak Nixki" each drop two items of loot:
Blackstone Buckler
Bloodstone Sword
Coldstone of Continuance
Flamestone of the Arcane
Irestone Band of Rage
Ritual Spinesplicer Reward: Aegis of Blackscales
Reward: Bloodlink Chestmail
Reward: Darkglint Blade
Reward: Dark Belt of Wrath
Reward: Blackstone Buckler
Reward: Bloodstone Sword
Reward: Mantle of Mending
Reward: Incantor Mask of Death
Reward: Ritual Spinesplicer
Reward: Flamestone of the Arcane
Reward: Coldstone of Continuance
Reward: Irestone Band of Rage
Reward: Artifact of Transcendence
Ikkinz Raid #4: Chambers of Destruction (Normal):
Before Raiding
Before you even think about doing this raid:
- You'll need a Rogue that can pickpocket (unknown skill check)
--- Alternatively, any class can use a Level 70 Goblin shroud to do so (this is confirmed as working).
- You'll need a caster with a Spell Research Kit (no skill required - container must hold at least four items).
- You'll need a priest with a Sewing Kit (no skill required - container must hold at least four items).
Pre-Requisites for requesting this raid:
- Completion of all three Ikkinz group trials
- Completion of Kevren's "Martyrs Passage" quest
- Completion of Kevren's "Temple of the Damned" quest
- Completion of Kevren's "Summoner Ring" quest
- Completion of Tublik's "Pit of the Lost" quest
- Completion of Tublik's "Crumbled Sanctuary" quest
- Completion of the "Icon of the Altar" quest
--- Must have the item "Icon of the Altar" on you to request.
Pre-Requisites for participating in this raid:
- If below Level 65, must have beaten the Tipt group expedition.
- If Level 65 or higher, there are no known participation requirements.
Requesting the expedition requires that you have at least six players in your group or raid. Unlike the first three Ikkinz raid, you do NOT have to be in raid format, and offline players count towards the total.
If you try to request the raid without pre-requisites, you simply get ignored by the Sentinel of the Altar (it has no hail response either way).
Summary
- Give your "Icon of the Altar" to the "Sentinel of the Altar" to trigger the expedition.
- Have your Rogue pickpocket the "Stalwart Caretaker" guarding the entrance.
--- Rogue should turn in the "Runic Inscription" to the Caretaker to open the door.
- Kill the two Altar Wardens (one in Twin Struggles room; one in Diabolic Destroyer room).
--- Caster researcher should loot the two Runed Glyphs from their corpses.
- Use the Runed Glyphs to open the next set of doors.
- Kill the two Altar Sentries (one in either hall).
--- Altar Sentries will emote according to which class type should kill it (caster, priest, hybrid, or melee).
--- Caster researcher should loot the two Runed Glyphs from the "a pile of bones" that spawn.
- Caster researcher should combine the four Runed Glyphs in a Spell Research Kit to create an Engraved Rune.
--- Engraved Rune will open the door to the arena (this is the room at the south end of the main hall).
- Kill the Altar Overseer (expect adds).
--- Loot the Geostone from its corpse to open the next door.
- Have a priest (with a Sewing Kit container) speak with the Phantasmal Priest.
--- Minor combine, followed by "north" and "south" to pick up ground spawns.
--- Turn in ground spawns to the two golems to make them aggro, then kill them.
- Move through the door and kill the two Curate Firetenders.
- Down the hall in the Glorification room is the Oracle of the Altar. Kill it.
--- Loot the drum from the Oracle's corpse (key to the next room).
- In the next room down the hall is the Altar Construct. Kill this (expect adds).
- Finally, fight and kill the Keeper of the Altar in the last room (expect many, many adds to be mostly kited while burning down the named).
Requesting the Expedition
This raid expedition is triggered by giving your "Icon of the Altar" to the "Sentinel of the Altar". This is a golem at the top of the giant temple in the northwestern part of Kod'Taz.
The Sentinel of the Altar motions for you to enter the altar through the entrance behind him.
To enter the instanced zone, head down the tunnel directly behind the Sentinel of the Altar and hang a right at the bottom of the ramp. Your compass should handle the rest.
LOADING, PLEASE WAIT...
You have entered Ikkinz, Antechamber of Destruction.
Lockout Timers
Unlike the group expeditions, this raid has no lockout timer upon request. Here, you receive a 12-hour lockout timer for each Altar Warden and each Altar Sentry (total: 48 hours for the four). You receive an additional 12 hours of lockout time upon the death of the "Altar Overseer", an additional 24 hours upon the death of "Oracle of the Altar", and another 48 hours upon the death of the "Keeper of the Altar" (for a total of four days if you complete the entire expedition).
Named Mobs
Group-quality named mobs that are confirmed to spawn in this instance:
Scorned Trusik Dissident (loot dropper - appears in crypt behind the arena)
Named mobs have a chance to be up as soon as you zone in.
The Caretaker
You say, 'Hail, Stalwart Caretaker'
The stone worker does not move. It almost seems not to have any purpose at all, yet it blocks the door behind it.
There is a magical force preventing you from opening this door.
A Rogue (or Goblin Rogue Level 70 Shroud) should pickpocket it until they receive a "Runic Inscription". Hand it the item:
Stalwart Caretaker motions towards the door behind it. You have passed the first test.
Stone grinds against stone and the door slides open.
At this time, you also receive a message in flash text:
Only research can solve the mystery of the runed glyphs. (Only a pure caster should loot the runes here.)
Altar Wardens
Kill the Altar Wardens in the first rooms encountered (one is inside the left [Twin Struggles] room and the other is inside the right [Diabolic Destroyer] room).
Each hits for a max ~2,500; has ~350,000 hitpoints; single-target rampages; randomly mem blurs itself; and casts "Fling" (knockback), "Throw" (dmg+knockback), "Bury" (feign death), and "Stone Explosion" (dmg proc). They are tethered to their rooms (reset health, aggro, and debuffs if pulled outside).
Altar Warden has been slain by _____!
Altar Warden's corpse crumbles to pieces almost instantly. Whatever is the driving force behind this creature must be siphoning the energy back into itself.
Between them, they drop "Runed Glyph: Noxit" and "Runed Glyph: Aexit". Have your designated researcher loot the runes from the Wardens. These runes are used to open the next two doors in the main hallway (Noxit opens the east door; Aexit opens the west door).
Dust falls around you as the glyphed rune causes the door to shake and open.
The runes on the glyph cause the door to open without any hesitation.
Altar Sentries
Altar Sentries hit for a max ~2,750; single-target rampage; mem blur; and cast "Earth Wave" and "Strike of Glory". They each have ~390,000 hitpoints.
Each Altar Sentry gives off an emote indicating who needs to get the kill shot:
Combined strength and ingenuity (Hybrids)
Strength and cunning (Melees)
The creature cannot stand up to the power of healers. (Priests)
The creature will perish under the strength of intelligent magic. (Casters)
Altar Sentry has been slain by _____!
The stone worker crumbles to the ground, its energy drained.
Each Altar Sentry, upon death, spawns "a pile of bones". This 'mob' drops "Runed Glyph: Grexit" and "Runed Glyph: Truxit" between them. Have the researcher loot these items.
The researcher needs to combine the four runes in a Spell Research Kit to produce "Engraved Rune" which will unlock the arena door.
You hold the Engraved Rune up to the door. The magic on the door recognizes the rune and opens for you.
Altar Overseer
Next up is a battle in the arena/pit room. The Altar Overseer is your target. Upon engaging, the Altar Monuments become active. If you keep your raid close to the center with the Overseer, you may reduce the amount of adds you get. Be prepared to kite them.
The Altar Overseer hits for a max ~4,100; single-target rampages; and casts "Bury" (feign death + 6,000 single-target DD), "Throw" (single-target DD for 3,000) and "Rain of Stone" (AE for 1,500). It may also mem blur a bit and summon other targets to its location.
Altar Overseer has been slain by _____!
Altar Overseer's corpse crumbles to pieces almost instantly. Whatever is the driving force behind this creature must be siphoning the energy back into itself.
Once the Overseer is dead, the Monuments become inactive. The Overseer drops an "Overseer's Geostone" and one item of stat loot. The Geostone is used to open the next door (doesn't matter who loots this).
The Phantasmal Priest
Head through the locked door west of the arena, and see the Phantasmal Priest (non-aggro at this time).
You say, 'Hail, Phantasmal Priest'
Phantasmal Priest says 'You seek to move beyond this door, yet I cannot allow that until someone with a like mind as me comes forward. Only they will understand the calling and only they can do what is necessary to proceed. If there be anyone who matches my ambitions, step forward to [answer the challenge].'
You say, 'I will answer the challenge!'
If you're not a priest, you see:
Phantasmal Priest says 'You are not of a similar mind as me. You will not understand the hardships. Be gone.'
If you're a priest, you see:
Phantasmal Priest says 'You are a priest. It is your ability -- in fact, your very calling -- that requires you to be able to manipulate it. You must sew these together and return to me the product so that I can verify the truth in your words and in your soul.'
You receive 4x "Dried Segment of Flesh". Combine these in a Sewing Kit (no skill required) to create a "Parchment of Flesh". Hand in this item.
Phantasmal Priest says 'Well done, _____. You have proven you are indeed the priest you claimed to be. This test is not yet over though. As a priest, you must be able to command stone. Before you can command them, you must find that which they lack. You must look to the [north] and to the [south]. Speak return and you shall be back.'
Say "north" to be ported to a small room with a ground spawn in it. Pick up "Stone Fragment", and then with nothing targeted, /say "return" to be ported back to the NPC. Repeat again with "south" for another "Stone Fragment".
Hand the "Stone Fragment" to each of the Guardians:
The guardian stirs slightly before settling down.
The two guardians come alive as the priest disperses! Your attempt at commanding them has failed!
The Priest, himself, disappears, while the 2x "Phantasmal Priest Guardian" mobs attack. These each hit for a max ~2,600 and frequently cast "Earthen Shrapnel" (an AE for ~500). They also cast "Fling" (AE knockback). Each has about 250,000 hitpoints. Kill them both, and then make your way down to the feasting den.
Phantasmal Priest Guardian has been slain by _____!
Phantasmal Priest Guardian's corpse cannot sustain itself anymore and crashes to the ground.
The Firetenders
The two Curate Firetenders each hit for a max ~2,500 and has about 200,000 hitpoints. They proc "Fire Burst" and AE the spell "Flames of the Fiend" (AE for ~2,700 dmg).
Curate Firetender has been slain by _____!
Curate Firetender's corpse is burned by embers before finally laying dead upon the ground.
Have someone with an open container slot loot the Glowing Chunks of Coal from their corpses. They'll have to loot a container further into the event.
Oracle of the Altar
You can range-kill the two Altar Sustainers behind the Oracle of the Altar. If you do this, be prepared for the Oracle to charge at you. It's leashed to the room, but may get a few hits in on people before it leashes.
Kill the Oracle of the Altar. It hits for a max ~2,900; flurries; has ~500,000 hitpoints; and AEs "Throw".
Oracle of the Altar has been slain by _____!
Oracle of the Altar's corpse crumbles to pieces almost instantly. Whatever is the driving force behind this creature must be siphoning the energy back into itself.
It drops a container called "Stone Drum of Cohesion" which needs to be looted by the person who looted the Glowing Chunks of Coal. Combine the Coals inside this container to produce a "Fused Trusik Signet". This key opens the next door.
The door reacts to the signet's aura. The ground trembles as the door opens.
Altar Construct
Be prepared for many, many adds with the Altar Construct. You'll want a few kiters prepared to handle the adds while the rest of the raid kills the Construct.
The Altar Construct hits for a max ~3,000; has ~550,000 hitpoints; single-target rampages; and casts "Crumbling Stone", "Cataclysm of Stone", and "Earthen Shrapnel". It spawns emote-based adds (waves of four at a time):
Altar Construct trembles violently as lesser constructs emerge from the ground.
This signals the spawn of 4x "Lesser Altar Construct" (hits for a max ~1,600 each; each has ~30,000 hitpoints).
Once the Altar Construct is dead, you can leash the adds.
Altar Construct has been slain by _____!
As the construct falls, you sense that a very powerful protector of the altar is waiting for you.
Keeper of the Altar
The Keeper of the Altar is found in the next room over. It's permanently rooted in place (summons when damaged); is immune to slow; hits for a max ~3,000; has approximately 1 million hitpoints; AE rampages; procs "Earth Wave" and "Kneeshatter"; and casts "Throw", "Bury", and "Earthen Shrapnel".
Earth Wave: PB AE 100', Prismatic (-350)
1: Decrease HP when cast by 1350
2: Stun (1.00 sec)
Kneeshatter: Single Target, Unresistable (-100)
1: Decrease HP when cast by 400
2: Decrease Movement Speed by 50%
3: Decrease Endurance by 600
4: Increase Poison Counter by 18
Bury: Single Target, Unresistable (0)
1: Decrease Hitpoints by 6000
2: Feign Death, 87% Success Rate
Earthen Shrapnel: PB AE 100', Magic (-300)
1: Decrease Hitpoints by 500
Throw: Single Target, Magic (-1000)
1: Decrease Hitpoints by 3000
It also spawns numerous adds, in waves of 11 at a time (10x "Altar Assailant" + 1x "Altar Adherent"):
Keeper of the Altar quakes violently as lesser assailants form from the ground to join in battle!
The Assailant adds hit for a max ~1,100. If kited, they will fall to the ground:
The assailant runs out of energy and crumbles to the ground.
The Adherent add hits for a max ~2,000 and is immune to slows. Adherents have the same kill requirements as the Altar Sentries you encountered earlier:
Combined strength and ingenuity (Hybrids)
Strength and cunning (Melees)
The creature cannot stand up to the power of healers. (Priests)
The creature will perish under the strength of intelligent magic. (Casters)
Keeper of the Altar has been slain by _____!
The Keeper of the Altar has been defeated! You have found a way to do what even the trusik priests of old had trouble with. You are well on your way to uncovering the secrets that Txevu has holed up inside its walls. Congratulations!
"a pile of bones" spawns nearby with "Sliver of the High Temple" (Gates of Discord progression item). Note that hostile adds do NOT despawn upon the Keeper's death.
Loot
The Altar Overseer and Oracle of the Altar each drop 1 item:
Aegis of Blackscales
Bloodlink Chestmail
Darkglint Blade
Mantle of Mending
Overseer's Geostone
Ring of the Brutish Beasts
Stone Drum of Cohesion
The Keeper of the Altar drops 4 items from its loot table:
Bauble of the Forlorn
Blazing Stone of Demise
Bloodied Ritual Trinket
Bloodstone of Force
Darkened Coldstone
Gem-Inlaid Ritual Cloak
Glyph-Lined Vrex Cloak
Incantor Mask of Death
Robe of Destruction
Sharp Irestone Fragment
Stone-Worked Pauldrons
Veil of Entrancement Reward: Ring of the Brutish Beasts
Reward: Aegis of Blackscales
Reward: Bloodlink Chestmail
Reward: Darkglint Blade
Reward: Dark Belt of Wrath
Reward: Mantle of Mending
Reward: Incantor Mask of Death
Reward: Blazing Stone of Demise
Reward: Darkened Coldstone
Reward: Glyph-Lined Vrex Cloak
Reward: Stone-Worked Pauldrons
Reward: Robe of Destruction
Reward: Tome of Tainted Axe of Hatred
Reward: Veil of Entrancement
Reward: Sharp Irestone Fragment
Reward: Bloodied Ritual Trinket
Reward: Gem-Inlaid Ritual Cloak
Reward: Bloodstone of Force
Reward: Sliver of the High Temple